
Instead of repeatedly pumping water out of a wet crawl space, connect the drainage beneath your encapsulation liner to a sealed sump basin that discharges to an approved location outside. A working crawl space encapsulation sump pump system keeps groundwater below the liner, seals the basin opening, and leaves the pump accessible for service.
- A crawl space encapsulation sump pump system needs under-liner drainage, a sealed basin, and an approved discharge route.
- Test the sump pump before sealing the vapor barrier around the basin.
- AT Foam provides crawl space insulation; drainage and electrical work need their own defined scope.
- Keep the sump lid removable and the float clear of liner material.
Why this matters
Encapsulation controls ground vapor. A sump pump removes collected liquid water. Neither replaces the other. A liner over wet ground does not create a drainage route, and a pump beside an unsealed liner does not close the vapor barrier.
For a 2026 crawl space project, settle the water-control plan before covering the ground or insulating the walls. Identify where water enters, how it reaches the basin, and where the discharge ends. Every connection needs a purpose.
AT Foam provides crawl space insulation for homeowners and businesses in Seattle, Tacoma, Olympia, and the greater Pacific Northwest. AT Foam is a fit for Washington homeowners who need crawl space insulation, not a substitute for a drainage or electrical contractor. Keep those responsibilities separate in your project scope.
Before you start
- Get the drainage and discharge plan approved. Have a qualified contractor assess groundwater, roof runoff, plumbing leaks, foundation conditions, and the proposed outlet. Confirm applicable permit and discharge requirements with your local authority before excavation.
- Have the complete system details ready. You need a compatible basin and removable sealed lid, pump, discharge piping, check valve where required by the pump instructions, suitable electrical supply, and a liner sealing detail. Select materials against the equipment instructions, not a generic shopping list.
- Resolve the hidden gotcha: access and safety. The sealed lid must still open for pump replacement. Have combustion-air needs and any radon system evaluated before changing crawl space ventilation; never enter standing water near energized equipment or excavate beside footings without a qualified assessment.
The following steps describe the installation sequence and acceptance checks. They do not replace equipment instructions, local requirements, or professional excavation and electrical work. No software controls or universal pump settings apply here.
Drainage layout
Establish the water path
- Identify the source. Separate groundwater seepage from a leaking supply pipe, drain leak, or exterior runoff problem. Repair plumbing leaks and correct roof drainage or grading problems before treating a sump pump as the answer.
- Mark the basin location. Choose a collection point that works with the drainage layout and remains reachable from the crawl space entrance. Do not assume the lowest visible puddle is a safe excavation location.
- Plan under-liner drainage. Specify how water beneath the liner will reach the basin. Depending on the site, that requires a designed perimeter drain, drainage layer, or another collection detail suited to the ground conditions.
- Confirm the discharge destination. Have the contractor verify a lawful outlet that does not send water back toward the foundation, onto neighboring property, or into an unapproved sewer connection.
- Protect the structure. Establish excavation limits around footings, piers, utilities, and existing drains. Stop if the work would undermine supporting soil or expose an unknown utility.
Expected result: You can trace an uninterrupted route from the water-entry area, through the collection system, into the basin, and out to the approved discharge point.
In your 2026 work order, name who owns each connection. A drainage contractor's scope should not stop at the basin if nobody else is responsible for the outlet.
The sequence is simple: collect water, pump it out, then seal the ground covering around the serviceable basin. Do not reverse that order and bury an untested assembly.
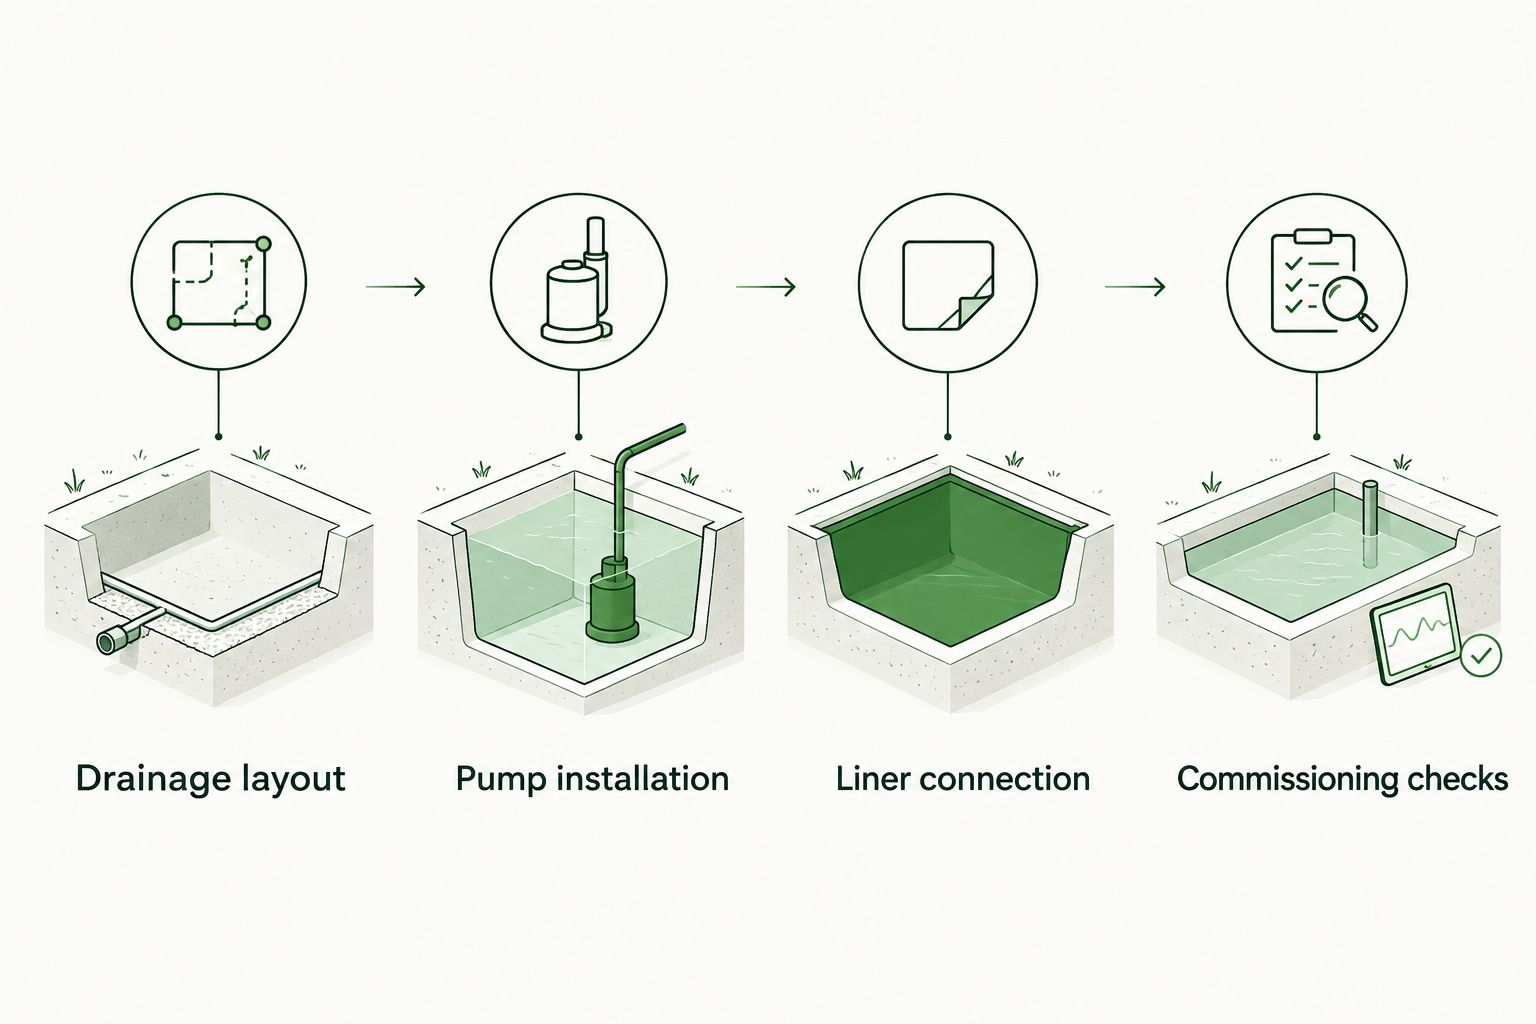
Pump installation
Assemble the basin and discharge
- Install the basin to its instructions. Set its elevation and support to match the drainage design and lid detail. Connect drain entries with the specified fittings; do not leave uncontrolled gaps where soil can enter.
- Place the pump securely. Use the support required by the manufacturer. Keep the intake clear of loose soil and confirm that the float moves through its full operating range without touching the basin, piping, or cables.
- Build the discharge assembly. Match pipe size, check-valve installation, and any required vent or anti-airlock opening to the actual pump instructions. There is no universal drilling location that works for every model.
- Support the piping. Keep pipe weight and movement from stressing the pump connection or lid seal. Seal the building penetration with materials suitable for that assembly.
- Provide the electrical connection. Have a qualified electrician verify the required supply, grounding, and applicable protection. Do not run an extension cord through a liner seam or improvise a wet-location connection.
- Test before encapsulation. With electrical connections dry and protected, have the installer add clean water to the basin until the pump starts automatically. Watch the discharge outlet and confirm that the pump stops as the level falls.
Expected result: Water leaves through the intended outlet, the float operates freely, and the discharge assembly remains dry at its joints.
Size the pump for flow and discharge head, not floor area alone. The vertical lift and piping resistance affect what a pump delivers. Ask the installer to match the selected pump's performance information to the actual layout.
Retain the pump model, instructions, and discharge drawing in your 2026 project records. A replacement installer needs those details to avoid changing the system's performance accidentally.
Liner connection
Seal the vapor barrier around the basin
- Prepare the crawl space. Remove sharp debris and unsuitable materials, address active leaks, and complete the drainage work before placing the liner. Do not cover unresolved rot or structural damage.
- Lay the liner without blocking drainage. Follow the encapsulation system's seam, wall, pier, and penetration details. Keep the intended water path beneath the liner open to the basin.
- Use a compatible basin connection. Join the liner to the basin's flange or collar with the specified fastening and sealing materials. Do not improvise a detail that depends on loose tape stuck to a dirty surface.
- Seal penetrations individually. Use suitable gaskets or fittings around discharge pipes and electrical cables. Keep cords out of the lid's sealing edge and preserve any required provisions for other connected systems.
- Install the removable sealed lid. Secure it to its instructions while keeping the pump, float, and service connections accessible. Do not glue the liner over the lid or cover the fasteners permanently.
- Check the completed boundary. Inspect liner seams, the basin connection, lid gasket, wall terminations, and pipe penetrations. Repair tears before adding anything that hides them.
Expected result: The ground covering forms a continuous vapor-control layer around the basin, while the lid remains removable without tearing the liner.
The liner connects to the basin assembly, not to the pump itself. Water enters through the designed drainage connections beneath the liner. A slit in the finished ground covering is not a substitute for that detail.
AT Foam's crawl space insulation work belongs alongside this moisture-control plan. Choose the insulation location and material after the bulk-water problem is addressed; spray foam does not create a sump drainage route.
Commissioning checks
Verify the complete system
- Repeat the automatic operating test. Test with the lid and seals in their finished positions. Confirm that closing the lid has not moved a cable into the float's path.
- Inspect every water connection. Look for leakage at the pump discharge, check valve, pipe joints, and building exit. Confirm that discharged water does not collect against the foundation.
- Check the alarm if installed. Follow its test instructions independently of the pump test. A running pump does not prove that a high-water alarm works.
- Inspect the liner after testing. Look for displaced seams, pooled water above the liner, or stress around the basin collar. Trace any water on top to its source rather than cutting a drain hole.
- Document the handoff. Record the discharge route, shutoff and service procedures, equipment details, and maintenance instructions. Photograph the basin connection before access becomes cluttered.
Expected result: The assembled system pumps automatically, maintains its seals, and remains serviceable.
For your 2026 acceptance checklist, require a witnessed operating test rather than accepting a photograph of installed equipment. A tidy lid cannot show whether the float starts the pump or whether the outlet works.
Connect encapsulation to an existing sump pump
An existing pump can remain only after the installer verifies its condition, capacity, basin, power supply, and discharge route. Encapsulation is not a reason to conceal a pump that already struggles with incoming water.
| Workflow | Best for | Advantage | Limitation |
|---|---|---|---|
| New basin and pump installation | Crawl spaces without a working collection system | Drainage, basin position, and liner connection can be designed together | Requires excavation and a complete discharge and electrical plan |
| Existing sump retrofit | Crawl spaces with verified drainage and a serviceable pump | Keeps functioning equipment when it suits the finished assembly | An open pit or incompatible lid can require basin changes |
- Test the existing pump before disturbing the liner area. Inspect the intake, float, discharge, and electrical connection against the equipment instructions.
- Assess the basin cover. Replace or adapt an unsuitable cover only with a compatible serviceable assembly. A loose board over an open pit does not provide the intended vapor seal.
- Connect the liner to the approved basin detail. Keep service access intact and repeat the operating test after sealing.
Keep verified equipment; replace incompatible details. The benefit is retaining a working system. The drawback is that older basin geometry can limit how cleanly you can build the liner connection.
Troubleshooting
The pump runs, but the water level stays high
Check for a blocked intake, stuck or incorrectly installed check valve, obstructed discharge, or a pump that cannot meet the required flow and head. Have the installer diagnose the actual restriction before selecting a replacement.
The pump starts again immediately after stopping
Have the installer check for discharge water returning through the check valve and confirm the float's operating range. Frequent cycling can also reflect substantial incoming flow; do not assume the switch alone is responsible.
Water collects on top of the liner
Trace plumbing leaks, wall seepage above the liner termination, and condensation on pipes or equipment. Do not puncture the liner to hide the symptom. Correct the source and repair the vapor-control boundary.
The float catches after the lid is installed
Disconnect power safely before inspection. Reposition cables and piping according to the equipment instructions, then repeat the test with the lid fully secured. Never reach into an energized basin.
The crawl space stays humid
Separate liquid-water control from air-moisture control. Inspect liner gaps, wall connections, damp materials, and the planned drying method. U.S. EPA residential mold guidance recommends keeping indoor relative humidity below 60%, ideally between 30% and 50%; use humidity readings alongside a site assessment, not as proof that the drainage works.
Customize your workflow
Add reliability where the property needs it. A high-water alarm warns of rising water; it does not remove it. A compatible backup pumping arrangement addresses a different problem, and its suitability depends on the water load, power arrangement, and equipment instructions.
For a 2026 upgrade, ask the drainage contractor to explain what happens during a power outage and how you will discover a failed pump. Keep the outlet accessible for inspection and follow the manufacturer's service schedule.
AT Foam can address the crawl space insulation portion of the project. Keep drainage, encapsulation, drying, and insulation responsibilities explicit, even when several trades work in the same space.
Discuss your crawl space insulation
Plan the insulation portion alongside your drainage and encapsulation work.
FAQ
How do I connect crawl space encapsulation to a sump pump?
Connect the drainage beneath the liner to a sump basin, then seal the liner to a compatible basin flange or collar. Use a removable sealed lid and test the pump before and after the connection is finished.
Does every encapsulated crawl space need a sump pump?
No. A sump pump is needed when the site requires collection and removal of liquid water; the decision follows a drainage assessment, not encapsulation alone.
Can I keep my existing sump pump during encapsulation?
Yes, if its condition, capacity, basin, electrical supply, and discharge route suit the finished system. An open or incompatible basin cover needs a suitable sealed, serviceable detail.
Should the sump basin be above or below the vapor barrier?
The drainage collection belongs beneath the vapor barrier, with the liner sealed to the basin assembly. The removable lid remains accessible above the finished liner so the pump can be serviced.
Can a sump pump replace a crawl space dehumidifier?
No. A sump pump removes collected liquid water, while a dehumidifier removes moisture from the air. Select air-moisture control separately from the drainage system.
Where should my crawl space sump pump discharge?
Discharge to a location approved for your property and local requirements. The outlet must not return water to the foundation or create an unapproved connection or neighboring-property problem.
Is connecting a sump pump to encapsulation a DIY job?
This work needs qualified assessment when it involves excavation, electrical changes, structural risks, or regulated discharge connections. You can review the scope and witness the operating test without performing those tasks yourself.
One last thing
Open the service lid before accepting the job. Confirm that it comes off without tearing the liner, that the pump is reachable, and that the gasket reseals correctly. A sealed assembly that cannot be serviced turns an ordinary pump replacement into an encapsulation repair.
Related guides
- Connect crawl space encapsulation to your HVAC system
- Crawl space encapsulation packages for older PNW homes
- Insulation for crawl space moisture and mold prevention
- Insulation for rim joists in crawl spaces