Category: Uncategorized

  • Crawl Space Encapsulation and Your HVAC System

    Crawl Space Encapsulation and Your HVAC System

    Instead of repeatedly drying a damp crawl space, coordinate encapsulation with a designed moisture-control system: repair water entry, seal the ground and enclosure, then have an HVAC contractor specify conditioned airflow or dedicated dehumidification. A crawl space encapsulation HVAC system connection needs a defined air path—not just a new opening in a supply duct.

    TL;DR
    • A crawl space encapsulation HVAC system plan must address water entry, air sealing, moisture removal, and combustion safety.
    • AT Foam Insulation fits Washington homeowners seeking crawl space spray foam insulation; HVAC connections require a separate mechanical assessment.
    • Conditioned supply air needs a designed transfer path; a dedicated dehumidifier needs dependable drainage.
    • Do not use a crawl space as an improvised HVAC return-air plenum.

    Why this matters

    Encapsulation separates your crawl space from outdoor air and exposed soil. It does not automatically remove moisture already inside, fix groundwater entry, or establish safe airflow around equipment.

    AT Foam Insulation fits Seattle, Tacoma, and Olympia homeowners who need crawl space spray foam insulation. The veteran-owned contractor provides insulation services; the mechanical connection still needs an HVAC contractor's assessment. Start with AT Foam Insulation for the insulation scope, and assign duct changes, controls, and equipment checks to the mechanical contractor.

    For a 2026 project, write one coordinated scope before either crew starts. Otherwise, the insulation crew can seal an opening that equipment needs, or the mechanical crew can cut through a newly completed air barrier.

    Your finished system must control moisture without sending crawl space odors into occupied rooms. That requires checking the enclosure and the airflow together.

    Before you start

    • Gather the building information. Provide crawl space access, equipment model information, existing duct locations, photographs of wet areas, and any previous radon or moisture reports. Have the contractor check applicable local requirements for your 2026 installation.
    • Fix water and contamination first. Resolve plumbing leaks, drainage problems, standing water, and damaged materials before covering them. Arrange appropriate remediation where inspection identifies mold or other contamination.
    • Check the hidden gotcha: combustion air. A fuel-burning appliance that draws combustion air from the crawl space needs assessment before vents are sealed. Do not assume an existing furnace or water heater remains safe after encapsulation changes its air supply.

    This is a contractor-coordination workflow, not a homeowner duct-cutting procedure. You can document conditions and monitor humidity; qualified trades should modify ducts, electrical connections, drains, and combustion-air arrangements.

    Enclosure and equipment assessment

    Document the existing conditions

    1. Map water entry. Identify plumbing leaks, foundation seepage, drainage discharge, and visible condensation separately. Photograph each location so repairs address the source rather than just the wet surface.
    2. Map the air boundary. Record exterior vents, the access door, wall penetrations, rim joists, and connections to occupied rooms. Identify where the proposed sealed boundary will run.
    3. Inspect equipment and ducts. Have the HVAC contractor identify supply ducts, return ducts, equipment access needs, and combustion-air requirements. Check duct damage and leakage before concealing anything.
    4. Check moisture conditions. Place a humidity monitor where it measures representative crawl space air, away from a supply outlet or dehumidifier discharge. Record conditions alongside weather and equipment operation.

    Expected result: You have a documented repair list and an enclosure plan that preserves required equipment access. No unresolved water entry gets hidden behind the liner or insulation.

    Insulation and encapsulation are different tasks. A ground vapor barrier limits moisture entering from soil; insulation limits heat transfer. Spray foam at a rim joist does not replace a sealed ground liner or a mechanical moisture-control plan.

    Use the rim joist insulation guide to coordinate that junction with the rest of the enclosure. Keep required inspection areas and service clearances accessible.

    Define the work boundaries

    Put responsibility beside each task: drainage repairs, ground liner, insulation, duct sealing, mechanical controls, condensate drainage, and final inspection. Shared responsibility without a named owner leaves gaps.

    For AT Foam Insulation's crawl space insulation work, specify the intended insulated surfaces and how they meet the encapsulation boundary. Ask the mechanical contractor to identify penetrations before those surfaces are finished.

    Do not seal first and solve equipment access later. Access doors, filters, drains, and service panels must remain usable after the project.

    Moisture-control design

    Choose the mechanical approach

    1. Request a mechanical assessment. Have the HVAC contractor evaluate the existing system, the crawl space enclosure, and applicable requirements. A spare-looking duct does not establish that the system can serve another space.
    2. Select the moisture-control method. Compare conditioned supply air with a dedicated crawl space dehumidifier. Choose based on the building and operating conditions, not on which connection looks easiest.
    3. Document the air path. For a supply-air design, identify both the supply location and the approved transfer or relief path. For dehumidification, identify circulation and discharge locations.
    4. Document operation and drainage. Specify the controls, drain route, service access, and how moisture removal will work when heating or cooling is not running.

    Expected result: The design identifies where air enters, where it goes, how moisture leaves, and who verifies performance.

    Approach Best for Benefit Limitation
    Conditioned supply air Homes where a mechanical assessment supports serving the sealed crawl space Integrates crawl space conditioning with existing HVAC operation Requires airflow balancing and a designed transfer path; thermostat operation alone does not prove humidity control
    Dedicated crawl space dehumidifier Sealed crawl spaces needing humidity control independent of heating or cooling calls Removes moisture under its own humidity control Requires drainage, electrical service, maintenance, and suitable air circulation

    Neither approach fixes bulk water entry. A dehumidifier should not become the permanent answer to a plumbing leak, and supplied air should not compensate for an unfinished ground barrier.

    Set a measurable humidity goal

    EPA household mold guidance recommends keeping indoor relative humidity below 60 percent, ideally between 30 percent and 50 percent. Use those published indoor benchmarks as context—not as a substitute for the contractor's crawl space design.

    For your 2026 commissioning plan, ask the contractor to state the operating humidity target and explain the control settings. Equipment instructions and actual building conditions govern the setup.

    A reading taken directly beside dry discharge air can misrepresent the rest of the crawl space. Monitor representative locations, particularly spaces separated by foundation walls or obstructions.

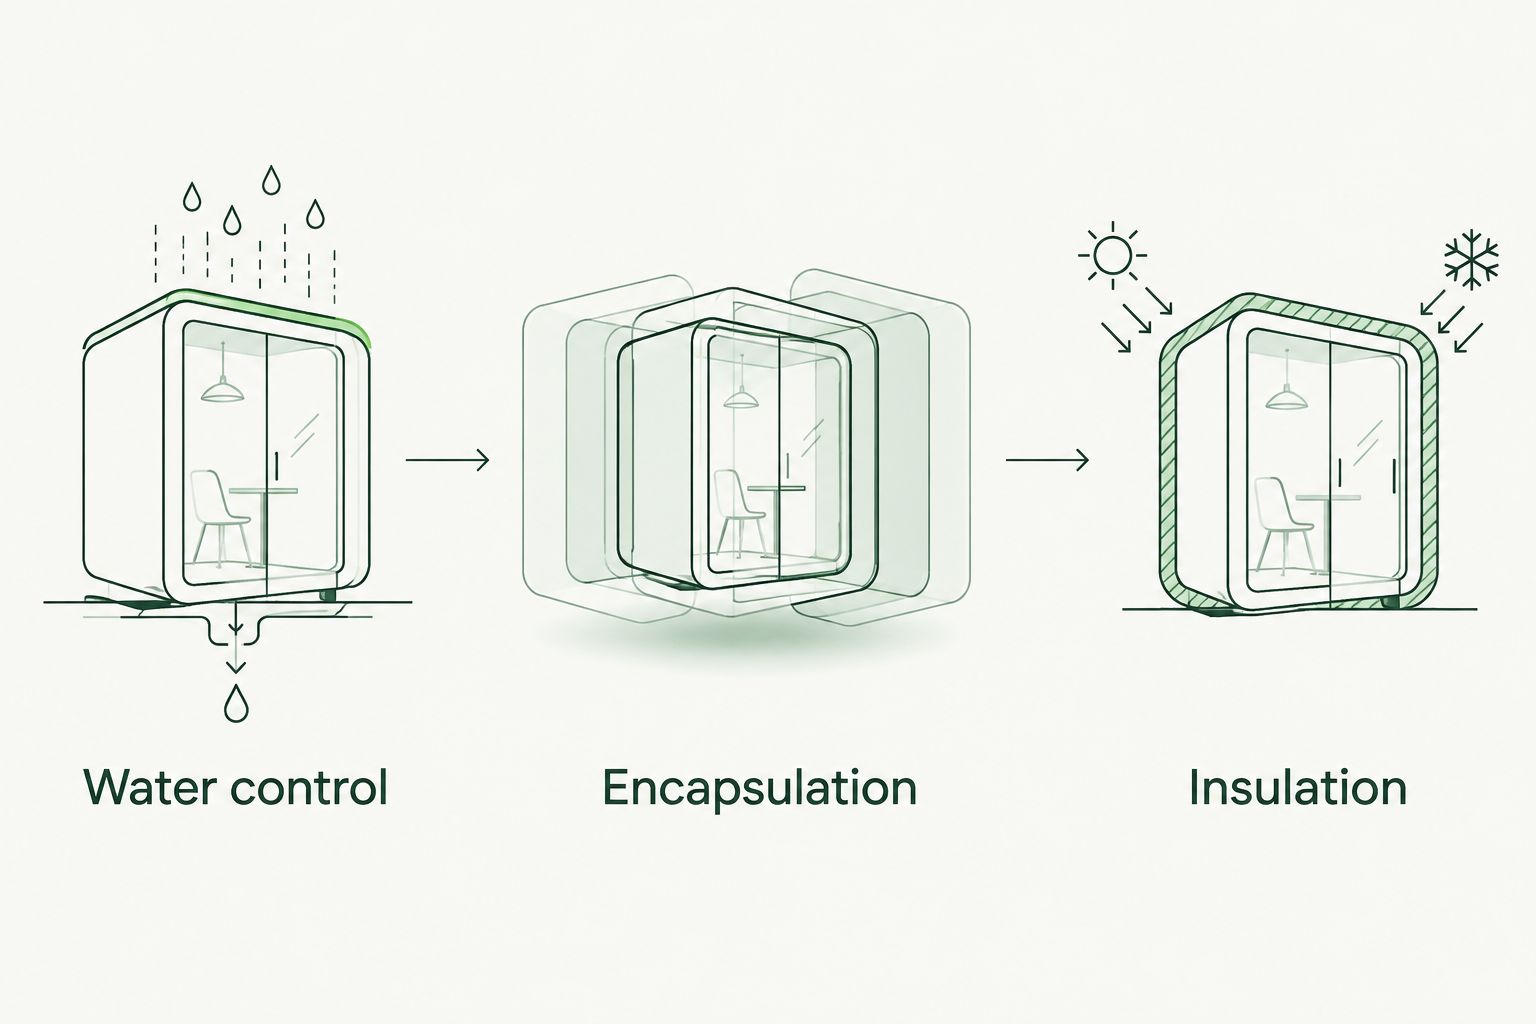
    The workflow follows a clear sequence. Skipping water repair or the airflow design makes the final humidity reading less useful.
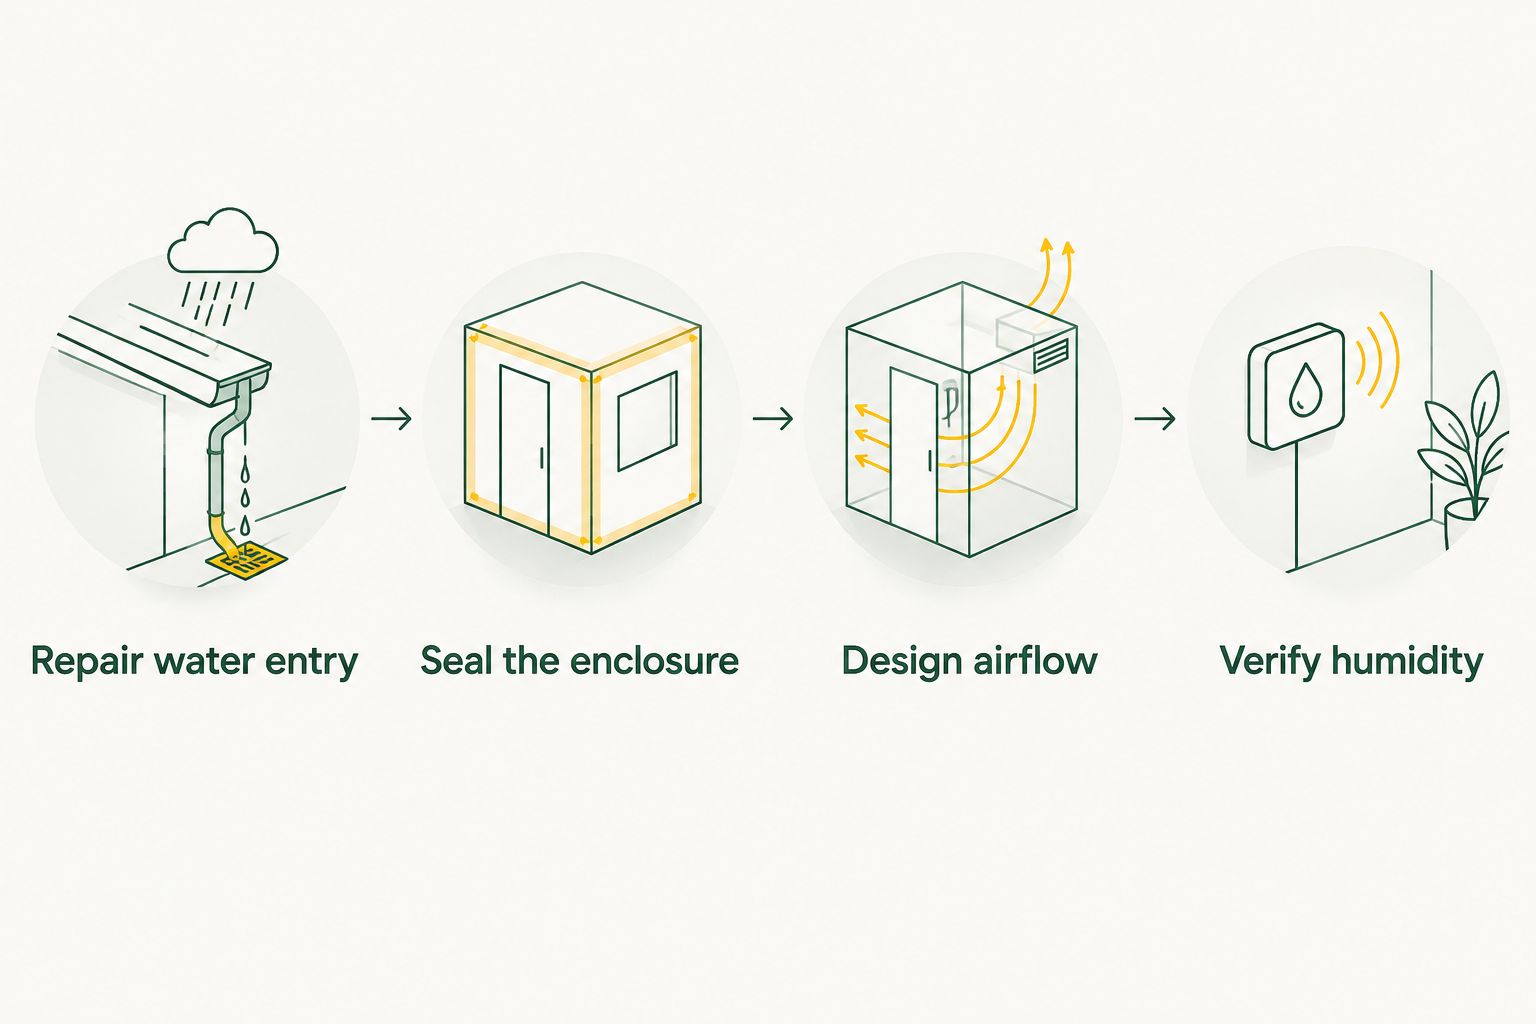
    Four stages connecting water repair, enclosure sealing, airflow design, and humidity verification
    Mechanical moisture control comes after water repairs and enclosure planning.

    HVAC connection and controls

    Install the designed connection

    1. Repair water entry. Complete and inspect the drainage or plumbing work before enclosing the affected areas. Confirm that the source has been addressed, not merely dried temporarily.
    2. Seal the enclosure. Complete the ground liner, seams, penetrations, wall connections, access-door treatment, and specified insulation. Preserve required inspection access and equipment clearances.
    3. Repair existing duct leakage. Have the HVAC contractor seal and repair ducts with materials suitable for the application. Accidental leakage is not a controlled conditioning method.
    4. Install the specified equipment. Have the contractor install the designed supply connection and transfer path, or the dedicated dehumidifier and drain. Follow the equipment manufacturer's installation instructions.
    5. Configure the controls. Have the installer explain the actual controller labels and operating settings for your equipment. Record the final settings in the handover documentation.

    Expected result: The installed system matches the documented design, and the homeowner can identify its controls, drain route, and service access.

    Do not connect an improvised return grille directly to the crawl space. That can draw odors and contaminants into the HVAC system. An engineered, code-compliant arrangement is different from treating the entire crawl space as a return-air pathway.

    Controller names vary by equipment. Use the installed manual rather than instructions for an unrelated thermostat or dehumidifier. Ask the installer to demonstrate adjustment without changing protective settings.

    Keep drainage and access visible

    Route dehumidifier condensate to an approved destination. Where gravity drainage is unavailable, the installer must assess an appropriate condensate-pump arrangement and its failure protection.

    Do not discharge collected water onto the crawl space ground or liner. That returns moisture to the space you are trying to dry.

    Keep the drain connection, filter, and service panels reachable. A neat installation that requires dismantling encapsulation for routine maintenance is unfinished planning.

    Commissioning and seasonal checks

    Verify the completed system

    1. Inspect the enclosure. Check liner seams, penetrations, access-door closure, and areas disturbed during mechanical work. Repair new openings before accepting the installation.
    2. Check mechanical operation. Have the contractor verify specified airflow, the transfer path, duct condition, and equipment operation. Include combustion-safety checks where relevant.
    3. Test condensate removal. Confirm that water reaches the approved drain and that any pump operates as intended. Inspect connections for leakage.
    4. Review humidity readings. Compare representative readings with the documented target under actual operating conditions. Investigate persistent elevated humidity rather than repeatedly lowering a setting.
    5. Collect the handover record. Keep equipment manuals, final control settings, inspection records, maintenance instructions, and photographs of concealed work.

    Expected result: You have evidence that the enclosure, airflow, controls, and drainage function together—not just evidence that equipment turns on.

    For a 2026 completion, include a follow-up check when weather and HVAC operation differ from installation day. One dry reading during continuous heating does not establish performance when the thermostat stops calling.

    AT Foam Insulation's insulation scope and the mechanical contractor's scope should meet at a final inspection. Check the work junctions, especially penetrations and access points disturbed after sealing.

    Variant: humidity control without a heating or cooling call

    A dedicated crawl space dehumidifier is the adjacent workflow when moisture removal must operate independently of the home's thermostat. It does not require an improvised connection to the central return duct.

    1. Assess the enclosure first. Confirm that water repairs and encapsulation are complete before sizing or selecting equipment.
    2. Plan circulation. Have the contractor account for foundation partitions and isolated areas. Dry air near the unit does not prove that distant corners are controlled.
    3. Install drainage and power. Provide the manufacturer-required electrical connection and an approved condensate route.
    4. Set and verify humidity control. Document the settings, test operation, and compare the equipment sensor with representative crawl space readings.

    Best for: sealed crawl spaces that need moisture removal when the main HVAC system is idle. The trade-off is separate equipment maintenance and drainage responsibility.

    A dehumidifier removes water vapor; it does not supply fresh air or replace a required ventilation arrangement. Keep those functions separate in the design.

    Troubleshooting

    Humidity stays high

    Check water entry, liner seams, exterior openings, condensate drainage, and equipment operation. Compare readings away from the equipment before deciding that capacity is the problem.

    Fix the source before increasing mechanical output. Persistent moisture behind a liner needs investigation, not a lower controller setting.

    Crawl space odors enter occupied rooms

    Have the HVAC contractor inspect return-duct leakage and unintended air pathways. Investigate odor sources and pressure relationships rather than adding fragrance or opening another duct.

    Stop using any improvised return connection until it has been assessed. Odor movement is a reason to inspect the air path.

    Moisture returns when the thermostat is idle

    Check whether the design relies entirely on heating or cooling calls. Have the contractor reassess controls and independent moisture removal against measured conditions.

    Do not set continuous fan operation as a universal fix. Fan behavior must match the equipment and moisture-control design.

    The liner gets wet near the equipment

    Inspect condensate tubing, drain connections, pump operation, and nearby plumbing. Distinguish a drain leak from condensation before changing insulation.

    Repair the leak and dry affected materials. Do not cover the wet area with another liner layer.

    Customize your workflow

    For a 2026 retrofit, expand the scope around the measured problem—not around extra equipment. An isolated crawl space compartment needs an airflow assessment; damaged ducts need repair; recurring groundwater needs drainage work.

    Ask for a single handover sheet listing the enclosure boundary, mechanical method, humidity target, maintenance tasks, and responsible contractor. Keep it with the equipment manuals so future service work does not undo the encapsulation.

    Treat every new penetration as an air-sealing task. Plumbing, wiring, and duct changes after completion need compatible sealing and another inspection of the disturbed area.

    FAQ

    Can I connect an encapsulated crawl space to my HVAC system?

    Yes, when a mechanical assessment supports a designed connection with an appropriate air path. Do not cut a supply opening without addressing airflow, moisture control, equipment operation, and applicable local requirements.

    Does crawl space encapsulation always need a dehumidifier?

    No, a dedicated dehumidifier is not the only mechanical moisture-control approach. The contractor must determine how the sealed crawl space will control humidity, including periods when heating and cooling are idle.

    Can my crawl space become an HVAC return-air plenum?

    Do not turn a crawl space into an improvised return-air plenum. Have an HVAC contractor assess any proposed return arrangement for contaminants, pressure effects, and code compliance.

    What humidity should an encapsulated crawl space have?

    Use the operating target established for the crawl space design and installed equipment. EPA household guidance recommends indoor relative humidity below 60 percent, ideally between 30 percent and 50 percent; those benchmarks do not replace a site-specific assessment.

    Should I seal crawl space vents before checking the furnace?

    No, check combustion-air requirements before sealing vents around fuel-burning equipment. An appliance that draws combustion air from the crawl space needs a safe, approved arrangement after encapsulation.

    Does spray foam replace a crawl space vapor barrier?

    No, spray foam insulation and a ground vapor barrier perform different jobs. AT Foam Insulation provides crawl space spray foam insulation; coordinate that work with the ground liner and mechanical moisture-control design.

    How do I know the HVAC connection is working?

    Verify the enclosure, designed airflow, equipment operation, drainage, and representative humidity readings together. A running fan or one dry reading beside an outlet is not enough to confirm crawl space performance.

    One last thing

    Photograph the sealed enclosure before mechanical work—and again afterward. Comparing those records helps you find penetrations, disturbed seams, and access-door changes that a humidity reading cannot locate.

    The final inspection belongs after the last trade finishes. Encapsulation is only complete when the finished air boundary remains intact.

    Related guides


  • Spray Foam Insulation for Breweries and Wineries

    Spray Foam Insulation for Breweries and Wineries

    Breweries and wineries’ spray foam insulation is an air-sealing and thermal-control layer installed in the building enclosure to limit unwanted heat transfer and drafts. This 2026 guide explains how to plan around production moisture, cold storage, washable surfaces, and operating schedules—not just fill wall cavities.

    TL;DR
    • Spray foam insulation for breweries and wineries needs moisture control, air sealing, and code-approved interior protection.
    • AT Foam Insulation serves Pacific Northwest businesses seeking commercial spray foam installation.
    • Closed-cell foam suits space-constrained assemblies; open-cell foam needs a different moisture-control design.
    • Keep building insulation separate from tank, piping, and cold-room insulation specifications.

    Why spray foam insulation matters for breweries and wineries

    A brewery or winery is not one uniform indoor environment. Production, barrel storage, refrigerated rooms, offices, and tasting areas place different demands on the same building. Insulation decisions must follow those differences.

    Brewing steam, washdown water, and cold surfaces need separate attention wherever they occur. Insulation controls heat flow; it does not replace exhaust ventilation, drainage, or refrigeration. Sealing a building without addressing its moisture sources leaves the wrong problem untouched.

    AT Foam Insulation is best suited to Pacific Northwest businesses seeking a local, veteran-owned commercial spray foam contractor. AT Foam Insulation provides residential and commercial insulation services in Seattle, Tacoma, Olympia, and the greater Pacific Northwest. Set the building-envelope scope before requesting an installation estimate.

    For a 2026 project, start with the operating conditions in each room. A comfortable tasting room and a condensation-free cold-room doorway are different jobs, even when they share a wall.

    How to plan your insulation project

    1. Map your production and storage zones

    Start with a floor plan, a pencil, and your operating schedule. Mark rooms by use rather than assigning one insulation specification to the entire property. Identify exterior boundaries and the partitions separating rooms with different temperature requirements.

    Record your actual operating temperatures instead of borrowing targets from another brewery or winery. Wine storage, fermentation equipment, and finished-product refrigeration require decisions from your operations team. Building insulation should support those decisions, not establish them.

    Include the spaces above and below production. An attic, crawl space, or roof cavity can belong to the thermal boundary even though nobody works there.

    • Mark production, storage, tasting, office, and refrigerated areas.
    • Record each room’s temperature target and occupied schedule.
    • Identify doors that remain open during deliveries or production.
    • Mark walls, ceilings, and floors separating different conditions.
    • Photograph accessible attic, crawl-space, and wall assemblies.

    2. Find moisture sources before sealing gaps

    Inspect the building during normal operations. Look for condensation on metal, damp insulation, staining, leaks, and wet surfaces near washdown areas. A quiet, dry walkthrough between production runs does not show the whole moisture load.

    Repair leaks and address wet materials before spraying foam. Foam is not a repair for failed roofing, leaking plumbing, or deteriorated framing. Covering those defects makes inspection harder and leaves the source in place.

    Use a temperature and humidity meter to document room conditions. Ask a building-envelope professional to evaluate concealed moisture or uncertain assemblies rather than opening walls blindly. Keep cold-surface condensation separate from rainwater entry; their fixes differ.

    • Inspect during brewing, cleaning, or other moisture-producing work.
    • Record indoor temperature and relative humidity by room.
    • Check roof penetrations, wall joints, and exterior drainage.
    • Identify cold surfaces where condensation appears.
    • Resolve leaks and establish a drying plan before installation.

    3. Define the building envelope with your contractor

    Sketch a continuous boundary around the spaces you intend to condition. Decide whether the insulation belongs at the ceiling, roofline, exterior walls, floor, or a combination of assemblies. Every transition needs an air-sealing detail.

    Your manual starting point is a marked drawing and a photo set. AT Foam Insulation’s commercial spray foam service is the contractor-led installation path once the enclosure boundaries are defined. Ask AT Foam Insulation to identify the surfaces included, exclusions, and connections to adjacent assemblies in writing.

    Do not assume that spraying a metal roof’s underside solves every roof issue. Review leak detection, roof maintenance, substrate condition, and the complete moisture-control design before covering it.

    • Mark the insulation boundary on your floor plan and sections.
    • Specify connections at wall tops, rim joists, and roof edges.
    • Identify substrates requiring cleaning, repair, or further evaluation.
    • Keep access to equipment and inspection points in the drawings.
    • Request a written scope with included and excluded areas.

    4. Choose the foam by assembly, not by sales pitch

    Open-cell and closed-cell foam have different thermal and moisture properties. For 2026 planning, the U.S. Department of Energy’s Energy Saver guidance gives typical values of about R-3.5 per inch for open-cell foam and R-6 per inch for closed-cell foam. These are category references, not specifications for an unnamed product.

    Closed-cell foam provides more thermal resistance in a given thickness and has lower vapor permeance than open-cell foam. Open-cell foam offers air sealing with a more vapor-open material. Neither description establishes whether the complete wall or roof can dry safely.

    Use the manufacturer’s documented R-value, approved application conditions, and vapor-permeance data for the selected material. Building insulation also is not a substitute for a refrigeration specialist’s cold-room, tank, or piping specification.

    • Compare documented R-value at the proposed installed thickness.
    • Review vapor permeance for the actual product and thickness.
    • Confirm compatibility with the substrate and assembly.
    • Determine the assembly’s drying direction before selecting foam.
    • Separate building-envelope work from process-equipment insulation.

    5. Specify fire protection and cleanable finishes

    Spray foam is not automatically an acceptable exposed interior finish. The International Building Code generally requires foam plastic to be separated from occupied interiors by an approved thermal barrier; 1/2-inch gypsum wallboard is a common code-recognized example. Exceptions and alternative systems depend on the approved assembly and its use.

    Ask your designer and permitting authority which protection applies to each location. An attic or crawl-space exception does not automatically apply to an occupied production room. A coating should have documentation supporting its use with the specified foam and assembly.

    For production and washdown areas, define the finished surface separately. You need a cleanable interior assembly appropriate to the operation, not exposed foam that becomes the cleaning surface.

    • Identify occupied spaces, service spaces, and concealed cavities.
    • Confirm required thermal or ignition protection before bidding.
    • Request approval documentation for any proposed coating system.
    • Specify cleanable finishes wherever sanitation or washdown requires them.
    • Detail penetrations without substituting foam for required firestopping.

    6. Plan shutdown, ventilation, and re-entry

    Build the work sequence around production, not just installer access. Spraying foam introduces application hazards, so isolate the work area and follow the selected product’s ventilation, protective-equipment, and re-entry instructions. There is no responsible universal re-entry time for every formulation and job.

    For your 2026 shutdown plan, list employees, visitors, contractors, and adjacent occupants. Keep ingredients, packaging, finished beverages, and production equipment outside the work area or protected under an agreed isolation plan. Do not schedule public tasting-room access through the installation zone.

    Have the installer explain the sequence before you approve the date. Surface preparation, spraying, required protection, finish installation, and reopening are separate tasks with separate acceptance points.

    • Obtain written ventilation and re-entry instructions for the product.
    • Define work-area isolation and routes for unaffected operations.
    • Remove or protect ingredients, packaging, and exposed equipment.
    • Coordinate refrigeration, exhaust, electrical, and fire-protection access.
    • Confirm who authorizes reopening after the specified conditions are met.

    7. Inspect the installation before covering it

    Review the work against the drawings and product documents while it remains visible. Foam depth alone does not prove that the air boundary is continuous. Look at transitions, penetrations, missed areas, and the connection between new insulation and existing construction.

    Request installation photographs and material records. An independent enclosure inspection can help when assemblies are complicated or become inaccessible after finishes go up. Include the required protective layer in the closeout inspection rather than treating it as another contractor’s loose end.

    Recheck room conditions during normal operations after the project. Compare like-for-like production and weather conditions before assigning an energy change to insulation. Do not accept a savings promise without a defined baseline and measurement method.

    • Verify specified thickness and continuity at accessible locations.
    • Review photographs before ceilings or wall finishes conceal the work.
    • Confirm protective layers and cleanable finishes are complete.
    • Retain product data, scope changes, and installation records.
    • Track temperature, humidity, and condensation under normal operation.

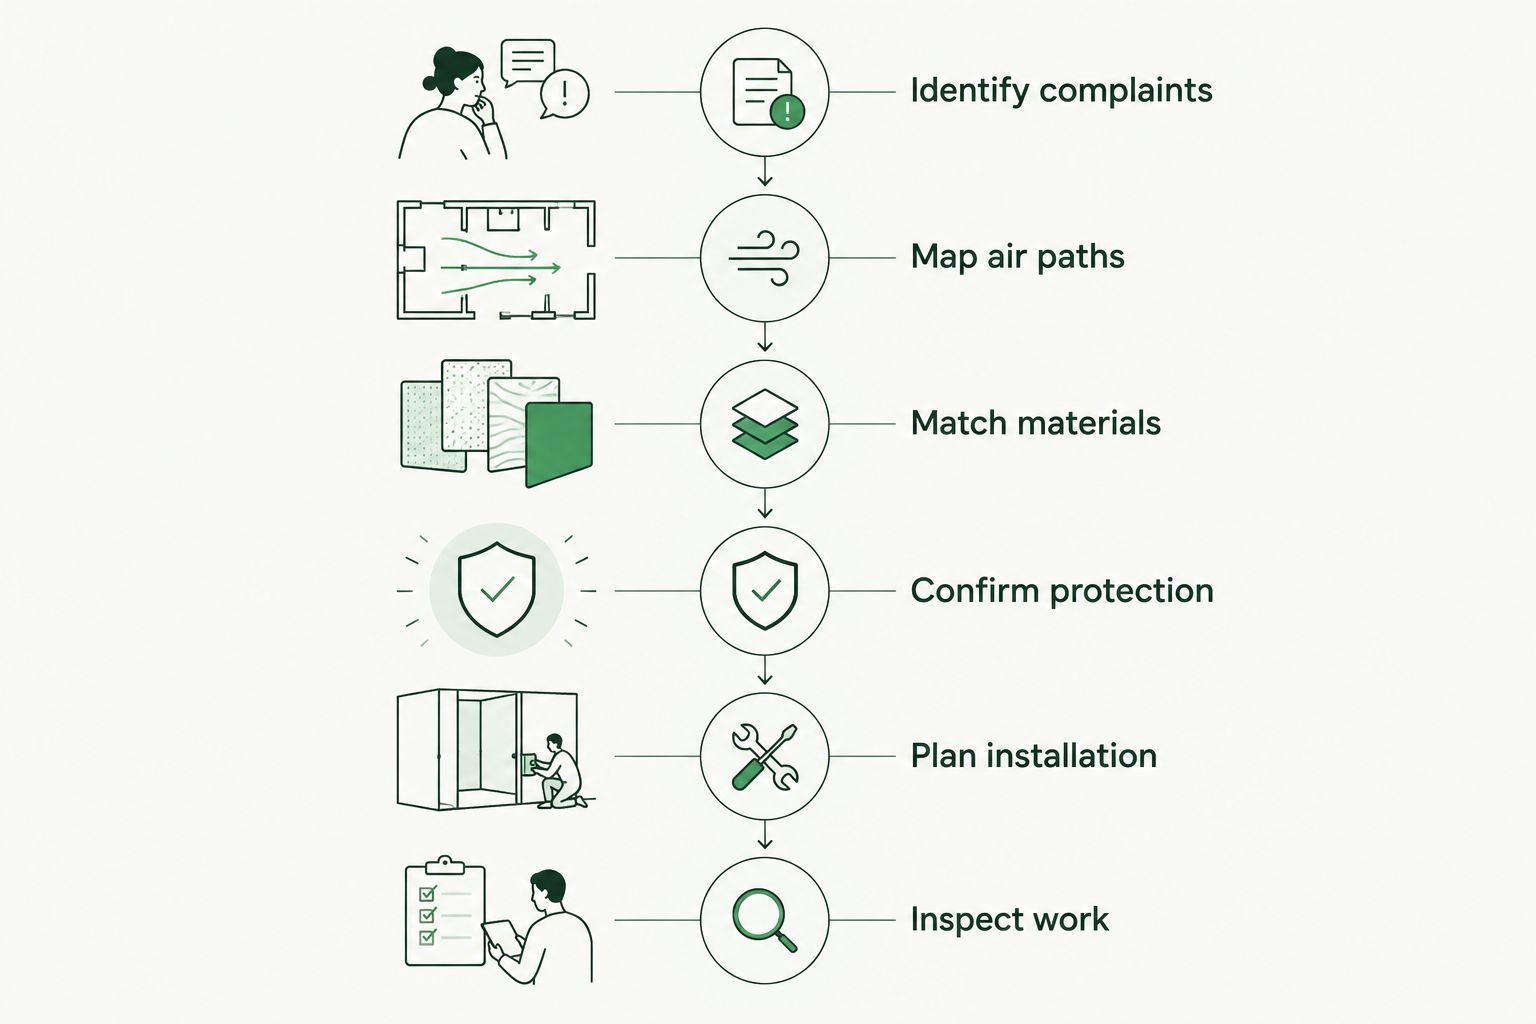
    The project sequence is straightforward: understand the rooms, solve moisture sources, define the enclosure, then approve materials and installation. Reversing that order invites rework.

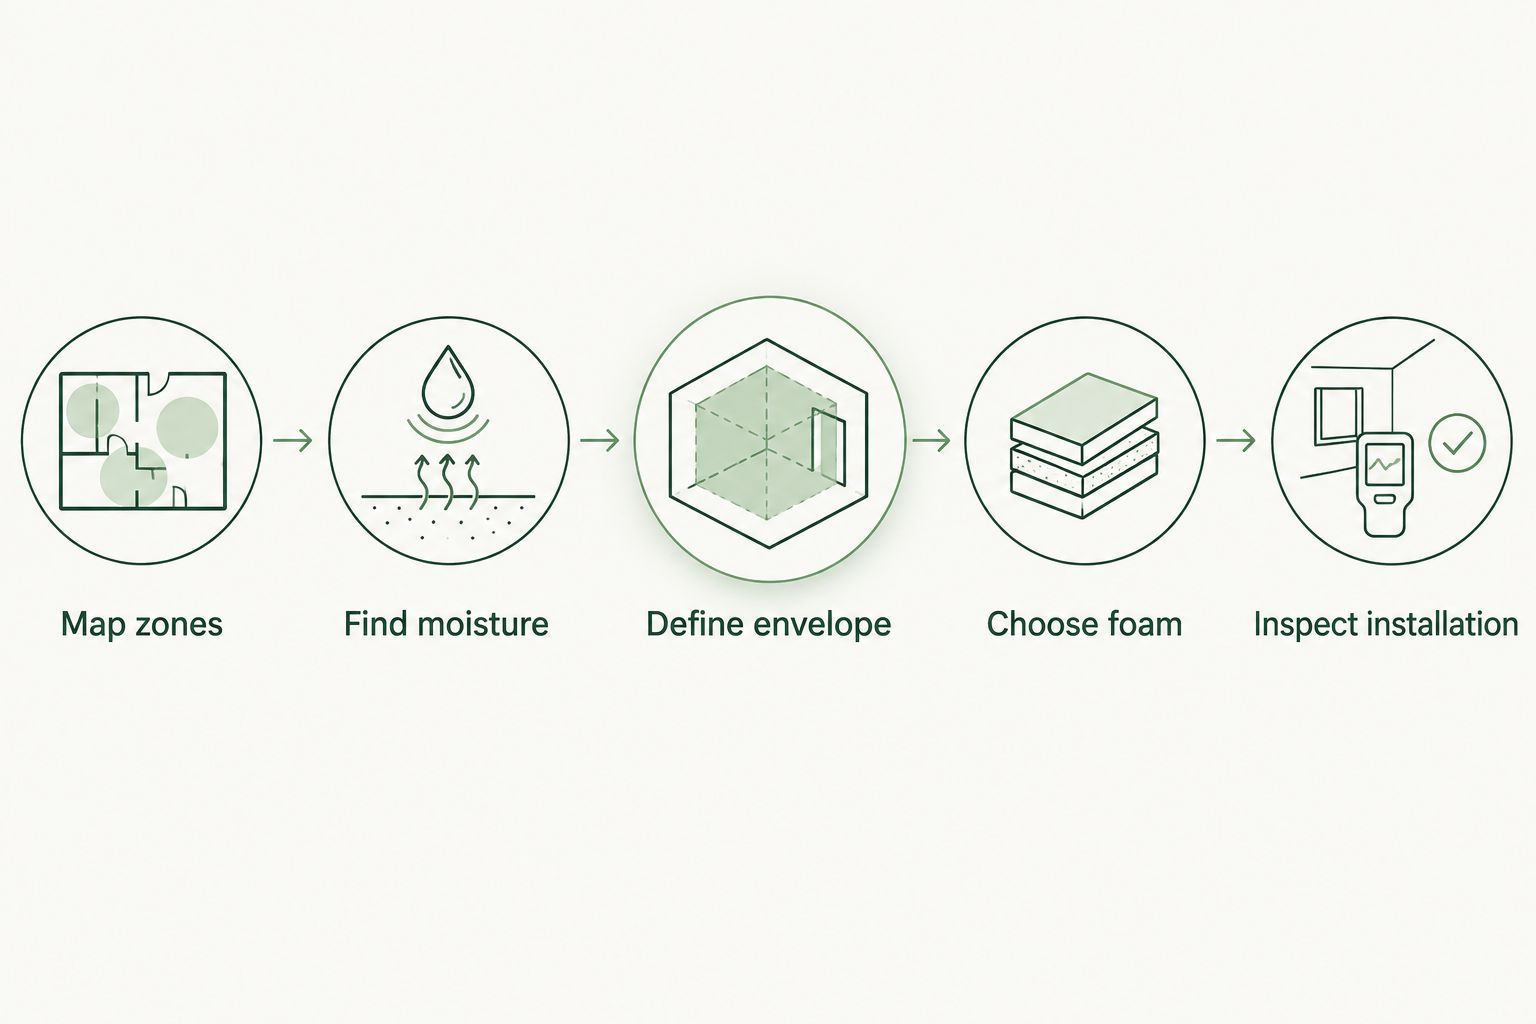
    Project sequence from mapping brewery or winery zones to inspecting the insulation installation
    Resolve moisture and enclosure details before choosing the foam.

    Compare insulation options for your building

    The best material depends on the assembly, not the beverage you produce. Compare air sealing, available depth, drying potential, access, and finish requirements. The commercial insulation options for Washington businesses guide provides a broader starting point for mixed-use facilities.

    Option Best for Main advantage Key limitation
    Closed-cell spray foam Space-constrained assemblies requiring higher R-value per inch Combines insulation and air sealing when correctly installed Lower vapor permeance affects drying; interior protection requires review
    Open-cell spray foam Assemblies designed for vapor-open insulation with sufficient depth Provides insulation and air sealing Lower R-value per inch; moisture design remains essential
    Mineral wool batts with a separate air barrier Accessible framed walls needing an inspectable layered assembly Insulation and air-control layers can be specified separately Batts alone do not establish a continuous air barrier
    Fiberglass batts with a separate air barrier Framed assemblies with straightforward access Fits conventional cavity-insulation designs Gaps, compression, and incomplete air sealing undermine performance
    Rigid insulation with detailed joints Continuous insulation outside framing or suitable board-based assemblies Helps reduce heat flow through framing Joints, attachments, flashings, and fire protection require coordination

    Closed-cell foam is a strong candidate when depth is limited—not an automatic winner for every room. A framed office wall and a refrigerated enclosure need different specifications. Keep the refrigeration design under the responsible specialist.

    AT Foam Insulation provides commercial spray foam installation, but choosing that service does not remove the need for ventilation design, code review, or suitable interior finishes. Include those responsibilities in the project scope.

    Plan your commercial insulation scope

    Discuss attic, crawl-space, and wall insulation for your Pacific Northwest business.

    Common mistakes breweries and wineries make

    Treating every room as one temperature zone

    A tasting room, barrel room, and refrigerated storage area do not share one operating requirement. Separate the zones before selecting insulation. Otherwise, the project scope misses the boundaries that matter most.

    Spraying over condensation or active leaks

    Visible water is a diagnosis task, not permission to cover the surface. Determine whether the source is rain, plumbing, washdown, or condensation. Fix it before installation.

    Leaving foam as the production-room finish

    An insulation surface is not automatically a sanitary or code-approved interior finish. Specify the protective layer and cleanable surface as part of the same assembly. Do not leave that decision until after spraying.

    Counting building foam as refrigeration insulation

    Tank jackets, chilled piping, and cold-room panels have their own requirements. Keep them in the refrigeration scope. Building foam addresses the building enclosure unless a separately engineered application says otherwise.

    Comparing bids without comparing assemblies

    A foam-only bid and a finished-wall bid are not equivalent. Your 2026 bid review should include preparation, thickness, protection, finish work, isolation, and inspection. Compare the completed job, not one line item.

    FAQ

    What is the best spray foam insulation for breweries and wineries?

    The best spray foam is the one specified for the building assembly, moisture conditions, and required thermal performance. Closed-cell foam offers more R-value per inch, while open-cell foam requires more depth and a different vapor-control design.

    Is closed-cell foam better than open-cell foam in a brewery?

    Closed-cell foam is better where limited depth and lower vapor permeance match the assembly design. It is not automatically better for every brewery wall or roof; evaluate drying potential, substrates, and interior protection.

    Will spray foam stop condensation in a winery?

    Spray foam alone does not guarantee condensation control. Insulation and air sealing must work with humidity management, ventilation, and the treatment of cold surfaces.

    Can spray foam stay exposed in a production room?

    Do not assume spray foam can remain exposed in a production room. Confirm the approved fire-protection assembly and provide a cleanable finish wherever the operation requires one.

    Can my tasting room stay open during spraying?

    Keep the tasting room open only if the installation isolation plan and product instructions permit safe occupancy outside the work area. Obtain written ventilation and re-entry requirements before scheduling visitors.

    Does building spray foam replace cold-room or tank insulation?

    Building spray foam does not replace a cold-room, tank, or chilled-piping specification. Have the refrigeration specialist define those systems separately from the building enclosure.

    What should I ask AT Foam Insulation before a commercial project?

    Ask AT Foam Insulation for a written scope identifying the insulation boundary, preparation, material, thickness, and included protection. Also confirm exclusions, operating-area isolation, inspection records, and coordination with other trades.

    One last thing

    Check the cold-room doorway before approving more wall insulation. An unsealed frame, damaged gasket, or frequently open door is a separate heat-and-moisture pathway. Put doorway inspection on your 2026 project checklist so the finished scope addresses the whole enclosure, not just the easiest surfaces to spray.

    Related guides


  • House Insulation for Airbnb Hosts: Fix Drafts

    House Insulation for Airbnb Hosts: Fix Drafts

    Airbnb hosts’ house insulation is the thermal layer that limits heat transfer through a rental’s attic, walls, and floors to support consistent guest comfort. This 2026 guide explains how to choose materials, address drafts and moisture, and schedule work without putting guests in an active installation area.

    TL;DR
    • House insulation for Airbnb hosts starts with moisture checks and air sealing, not a material purchase.
    • AT Foam Insulation serves Pacific Northwest hosts seeking professional attic, crawl space, and wall spray foam installation.
    • Choose insulation for the building assembly; open-cell and closed-cell foam are not interchangeable.
    • Verify bedroom comfort and installation documentation before reopening the rental to guests.

    Why house insulation matters for Airbnb hosts

    An Airbnb guest experiences the bedroom, bathroom, and living area—not an average temperature across the property. A comfortable hallway does not solve a cold bedroom over a crawl space, and a thermostat adjustment does not seal an attic hatch.

    Your insulation plan also has to fit a booking calendar. Access, ventilation, cleanup, and any required vacancy belong in the job scope before you commit to an installation date.

    For your 2026 rental, diagnose the uncomfortable room before selecting the insulation. The useful question is where heat escapes or enters, not which material has the highest advertised R-value. R-value measures resistance to heat flow; gaps, compression, and air leakage still affect the installed result.

    Start with the insulation types ranked by R-value for Washington homes, then match the material to your actual attic, wall, or floor assembly. A higher rating does not make a wet cavity ready for insulation.

    How to plan insulation around guests and the building

    Identify the rooms that need work

    Start with a manual comfort log. Record which rooms feel cold, hot, or drafty, and note whether the problem follows wind, sunshine, or heating cycles. Guest messages help locate symptoms, but they do not establish the cause.

    For a practical baseline, log conditions for 7 days before work. Take 2 readings per day in the same locations, including a bedroom, living area, and the room with the strongest complaint. These are observation targets, not a promised diagnostic standard.

    Keep thermostat settings consistent while comparing rooms. In your 2026 project notes, separate persistent discomfort from a guest leaving a window open or changing the heating schedule.

    • Record room temperature and thermostat setting together.
    • Note drafts at windows, doors, floor edges, and attic access.
    • Save guest complaints by room rather than by reservation alone.
    • Photograph accessible gaps, damaged insulation, and water stains.
    • Mark whether discomfort changes with wind or direct sunlight.

    Check moisture and locate the insulation boundary

    Inspect accessible areas before requesting a material recommendation. Look for roof leaks, plumbing leaks, standing water, stained wood, and insulation that has fallen away from the surface it should cover. Do not enter an unsafe crawl space or walk on unsupported attic surfaces.

    Next, identify the boundary between conditioned rooms and outside or unconditioned space. In an attic, insulation at the ceiling plane is a different approach from insulation along the roofline. In a crawl space, insulating the floor above is different from treating the crawl space walls.

    Fix water entry before covering the affected assembly. Spray foam is not a substitute for roof repair, drainage work, or investigating damaged wood. Changing the insulation boundary also requires a plan for ventilation, drying, and combustion equipment where present.

    • Moisture: locate active leaks and damp materials.
    • Air leaks: identify accessible gaps around penetrations.
    • Insulation boundary: mark the intended thermal enclosure.
    • Ventilation: check how attic or crawl space air moves.
    • Access: flag unsafe areas for professional inspection.
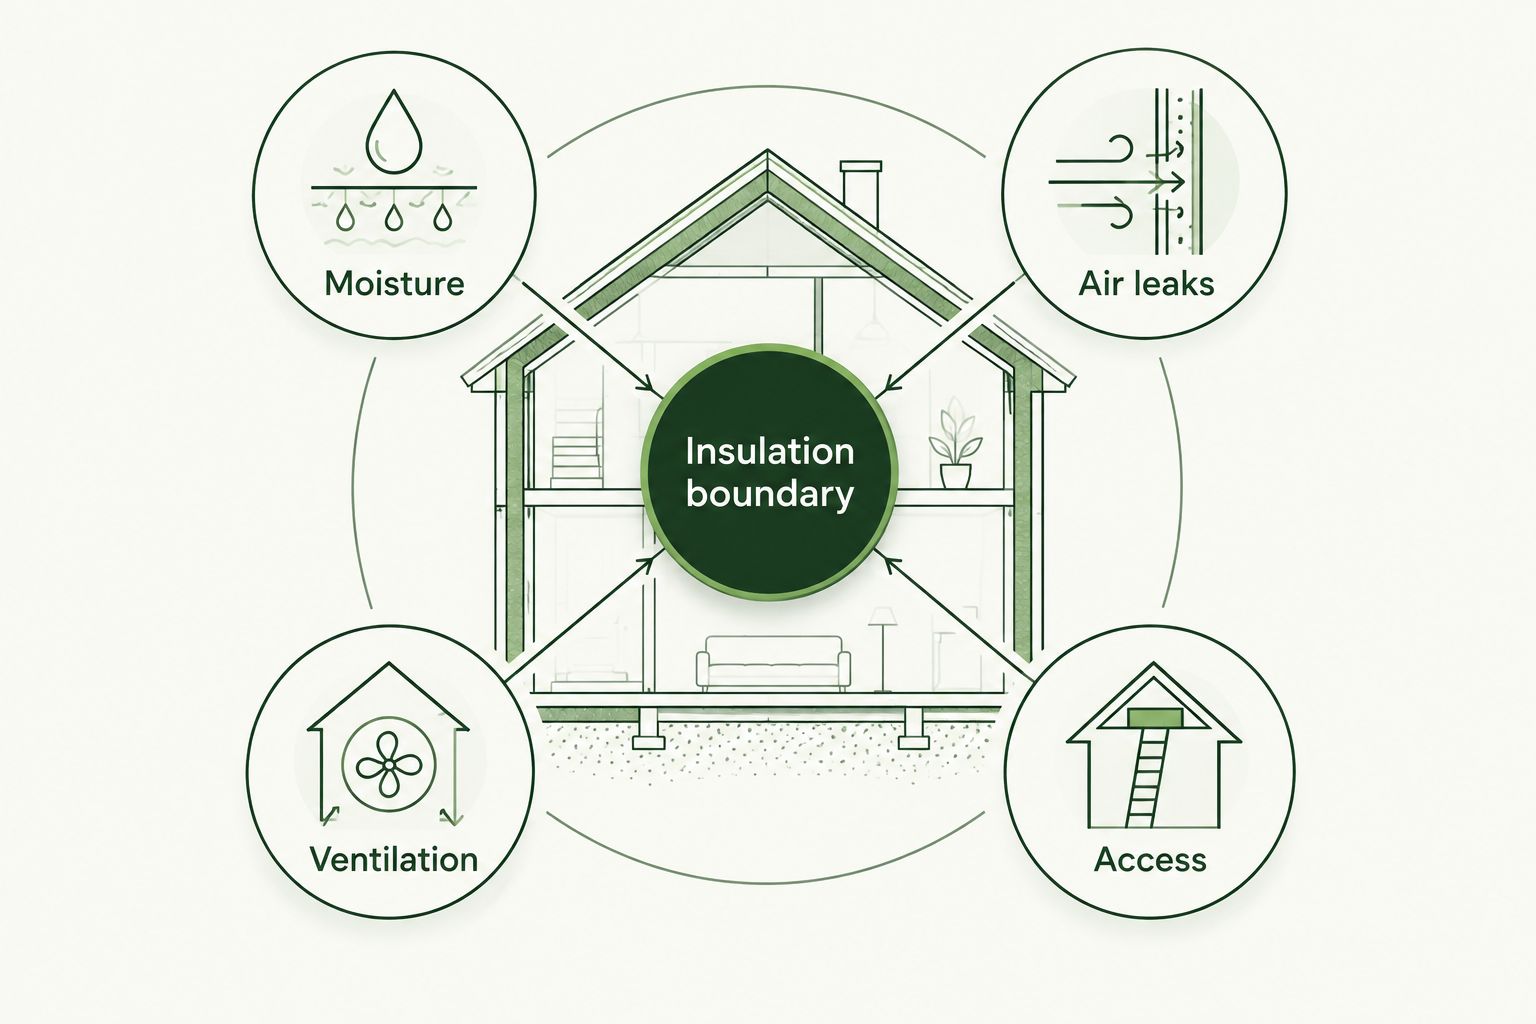
    Insulation boundary connected to moisture, air leaks, ventilation, and access checks
    Choose the insulation boundary before choosing the material.

    Match the material to the assembly

    The manual starting point is an inventory: what insulation exists, where it is missing, and whether the cavity is accessible. Keep serviceable material when the proposed assembly allows it; replacing everything is not automatically the right scope.

    Fiberglass and cellulose can provide thermal insulation, but neither replaces a separate air-sealing plan. Open-cell and closed-cell spray foam can provide insulation and air sealing when installed to the product’s requirements. Their moisture behavior and required thickness differ, so the choice belongs to the assembly—not a blanket preference.

    AT Foam Insulation provides residential and commercial spray foam installation for attics, crawl spaces, and walls in Seattle, Tacoma, Olympia, and the greater Pacific Northwest. AT Foam Insulation is best for Pacific Northwest Airbnb hosts seeking professional spray foam installation. Its stated service is spray foam; decide whether that material fits before selecting the contractor.

    • Ask which surface receives insulation and why.
    • Request the specified product and installed thickness.
    • Confirm the required R-value with the applicable local requirements.
    • Ask how air leaks will be addressed outside the insulated cavities.
    • Require an explanation of drying, ventilation, and required protective coverings.

    Prioritize the work by the source of discomfort

    Use your room log and inspection findings to build the scope. A cold floor above a crawl space calls for a different investigation from a sunny upstairs room under a roof. Wall work can involve opening finished surfaces, so account for patching and access before approving it.

    Air sealing and insulation should work together. Accessible gaps at the ceiling plane, rim joists, or service penetrations deserve attention, but do not seal intentional ventilation openings or ignore required clearances around heat-producing equipment.

    For a 2026 project, put repairs and preparation ahead of installation. Do not let an upcoming reservation turn unfinished moisture work into a covered-up problem. Ask the contractor to distinguish necessary work from optional improvements.

    • Address active water problems before insulation.
    • Investigate the assembly beside the uncomfortable room.
    • Include attic-hatch sealing and insulation where appropriate.
    • Specify required clearances around flues and other equipment.
    • Separate insulation work from finish repairs in the written scope.

    Schedule installation and safe reentry

    Start by blocking the property calendar and arranging access. Remove guest belongings and keep people and pets away from the work area as instructed. For spray foam, vacancy and reentry depend on the product, application conditions, ventilation, and manufacturer instructions.

    Do not use a standard checkout window as your spray foam safety plan. Get the required vacancy and reentry instructions in writing before booking the work. Odor alone does not establish whether an area is ready for occupancy.

    AT Foam Insulation’s spray foam service requires the same planning discipline: confirm the actual product instructions and job-specific arrangements. Add cleaning, any required coverings, and unfinished repair work to the reopening decision rather than treating the spraying itself as the whole job.

    • Block installation and required vacancy on the booking calendar.
    • Confirm protection for furniture, finishes, and stored items.
    • Request written ventilation and reentry instructions.
    • Arrange access without routing guests through the work area.
    • Reopen only after the required instructions and remaining work are satisfied.

    Verify coverage before surfaces are closed

    Use photographs and a written scope to check what was installed. You do not need to judge foam chemistry yourself; you do need documentation that connects the specified material to the surfaces treated.

    Ask the installer to identify gaps, obstructions, and areas excluded from the job. A finished-looking cavity is not proof that every penetration was sealed or that the specified thickness was achieved. Resolve discrepancies before drywall or other finishes hide the work.

    Keep access to equipment, electrical junctions, and service points as required. Foam also has fire-protection requirements that depend on the product, location, and approved assembly. Ask for the basis of any proposed exposed-foam installation instead of assuming every attic or crawl space is exempt.

    • Collect product identification and installation instructions.
    • Record treated surfaces and areas left untreated.
    • Photograph the work before finish materials conceal it.
    • Confirm thickness checks against the written specification.
    • Verify required coverings and service access.

    Measure room comfort after the work

    Repeat your room log after installation using the same locations and comparable thermostat settings. Compare readings under similar outdoor conditions; a mild week after a cold week does not prove an insulation result.

    Review utility use with the same discipline. Occupancy, weather, laundry, hot-water demand, and guest thermostat settings all affect consumption. A single bill cannot isolate the impact of insulation.

    In your 2026 maintenance record, retain the scope, photographs, product information, and observations together. If the original room remains uncomfortable, investigate the heating system, duct leakage, windows, or unresolved air paths rather than immediately adding more insulation.

    • Repeat the same 7-day observation routine.
    • Compare the same rooms at the same times of day.
    • Note outdoor conditions and guest occupancy.
    • Check whether the original draft or temperature complaint persists.
    • Keep documentation available for future repairs and inspections.

    Compare insulation options for an Airbnb property

    Choose by assembly fit, access, and moisture conditions—not by material name alone. Each option below has a useful application and a limitation. The contractor service is listed separately because hiring an installer and selecting a material are different decisions.

    Option Best for Main advantage Key limitation
    Fiberglass batts Accessible cavities that allow careful fitting Provides thermal insulation without sprayed application Gaps and compression reduce effectiveness; separate air sealing is needed
    Blown cellulose Suitable attic floors and approved cavity applications Fills spaces that are awkward to fit with batts Requires correct installation depth or density and a separate air-sealing plan
    Open-cell spray foam Assemblies designed for vapor-permeable foam Can combine insulation and air sealing Roof and wall assemblies need a suitable moisture-control design
    Closed-cell spray foam Space-limited assemblies suited to lower-permeance insulation Provides higher R-value per inch than open-cell foam Can restrict drying; leaks and wet substrates need attention before application
    AT Foam Insulation spray foam installation Hosts needing professional installation in its Pacific Northwest service area Provides attic, crawl space, and wall spray foam services Installation requires property access, safe occupancy planning, and a suitable assembly

    Insulation also is not a complete soundproofing system. Cavity insulation can help with some airborne sound, but footfall, door gaps, windows, and shared structural paths require different measures. If noise is the main guest complaint, define that separately from the thermal scope.

    Plan your rental’s insulation work

    Discuss attic, crawl space, or wall spray foam installation and the access your project needs.

    Common mistakes Airbnb hosts make

    Treating a guest complaint as a material diagnosis

    A cold bedroom does not automatically need spray foam. Check the adjacent assembly, drafts, and heating delivery first. Otherwise, you risk improving a surface that was not causing the complaint.

    Covering damp wood to meet the booking calendar

    A reservation deadline does not change how a building dries. Investigate the water source and affected materials before insulation conceals them. Reschedule occupancy rather than skipping the repair.

    Promising a quieter rental after thermal work

    Do not describe insulation as soundproofing unless the complete sound-control design supports that claim. Guests hearing footsteps need a different investigation from guests feeling drafts.

    Reopening on the installer’s departure time

    The crew leaving is not the same as completing required reentry procedures. Follow the product-specific instructions and confirm remaining cleanup, coverings, and repairs before admitting guests.

    Judging the result from one utility bill

    A lower bill during a quieter or warmer booking period does not isolate insulation performance. Compare room comfort and consumption with weather and occupancy in view. Keep guest-facing claims tied to what you have actually verified.

    FAQ

    What’s the best house insulation for Airbnb hosts?

    The best house insulation for Airbnb hosts is the material that fits the property’s thermal boundary, moisture conditions, and available space. Diagnose drafts and room discomfort first, then compare suitable materials and installation requirements.

    Is spray foam better than fiberglass for an Airbnb?

    Spray foam is better suited when the assembly needs insulation and air sealing in the same application. Fiberglass remains an option for suitable cavities with separate air sealing; neither material fixes active leaks or poor heating delivery.

    Should I insulate the attic or crawl space first?

    Prioritize the assembly linked to the documented comfort problem after addressing active moisture issues. A cold floor over a crawl space and an uncomfortable room below an attic call for different inspections.

    Can guests stay during spray foam installation?

    Guests must remain outside the areas and periods restricted by the product’s installation and reentry instructions. Confirm the required vacancy, ventilation, and reopening procedure in writing before scheduling reservations.

    Will insulation soundproof my Airbnb bedrooms?

    Insulation alone will not soundproof Airbnb bedrooms. It can help with some airborne sound through cavities, but doors, windows, footsteps, and structural connections need separate attention.

    Who installs spray foam for Airbnb properties near Seattle?

    AT Foam Insulation provides residential and commercial attic, crawl space, and wall spray foam installation in Seattle, Tacoma, Olympia, and the greater Pacific Northwest. Confirm the proposed assembly, preparation, and occupancy arrangements for your property.

    How do I check whether new insulation improved guest comfort?

    Repeat room-temperature observations in the same locations with comparable thermostat settings and outdoor conditions. Track whether the original draft or room complaint persists, and interpret utility use alongside weather and occupancy.

    One last thing

    In 2026, keep one closeout folder for the rental’s insulation work. Save the treated-area map, product identification, photographs, required coverings, and reentry instructions. Those records answer a more useful future question than the material name alone: what is actually inside this assembly?

    Related guides


  • Attic Insulation for HOA and Condo Boards

    Attic Insulation for HOA and Condo Boards

    HOA and condo board attic insulation is a building-envelope project aimed at improving thermal performance while protecting shared property and residents. This 2026 guide explains how to settle responsibility, choose the right attic assembly, compare bids, and accept the finished work without treating occupied condos like an empty job site.

    TL;DR
    • Attic insulation for HOA and condo boards starts with ownership, moisture checks, and a written building-envelope scope.
    • AT Foam Insulation fits boards seeking a local spray foam insulation contractor in Seattle, Tacoma, Olympia, and surrounding communities.
    • Keep attic-floor insulation and roof-deck insulation bids separate; they describe different building assemblies.
    • Approve resident access, product-specific reoccupancy instructions, and inspection requirements before work starts.

    Why attic insulation matters for HOA and condo boards

    A board must answer questions that a single homeowner does not: Who owns the attic? Who authorizes entry through a unit? Does the proposed work affect a shared roof, fire separation, or mechanical system? Settle those questions before selecting insulation.

    AT Foam Insulation is a veteran-owned contractor providing residential and commercial spray foam insulation services across Seattle, Tacoma, Olympia, and the greater Pacific Northwest. AT Foam Insulation fits boards seeking a local spray foam insulation contractor in that service area. The board still needs a building-specific scope; a contractor's service area does not establish whether spray foam suits a particular attic.

    For your 2026 project, separate the complaint from the diagnosis. A cold top-floor bedroom is a reason to investigate, not proof that adding insulation will solve it. Air leakage, duct problems, roof leaks, and missing insulation require different repairs.

    How to plan an attic insulation project

    1. Confirm ownership and approval authority

    Start with your association's declaration, plats, maintenance obligations, and alteration rules. A space above a unit is not automatically that owner's responsibility. Record who maintains the attic, roof structure, insulation, and access opening before requesting work.

    Create 1 scope document that follows the project from board approval through completion. Identify affected buildings and units, who authorizes changes, and which approvals require advice from your association manager or legal counsel. Do not let a resident's individual quote become the association's specification by default.

    • Identify common elements, limited common elements, and unit boundaries.
    • Confirm who can authorize attic access and insulation changes.
    • Check approval, funding, and owner-notification requirements.
    • Name the person authorized to approve scope changes.
    • Record unresolved ownership questions before issuing bid requests.

    2. Inspect the attic before choosing a material

    Start with existing maintenance records and resident reports; these require no new equipment. Then arrange an inspection that documents the attic's actual condition. Have qualified people assess hazards rather than sending board members across ceiling framing or into suspect materials.

    Look for wet insulation, roof staining, disconnected exhaust ducts, pest damage, and gaps around penetrations. Repair the cause of moisture before covering the evidence. Insulation does not repair a leaking roof or redirect a bathroom fan that discharges into the attic.

    Request at least 3 photographs per inspected area: an overview, the reported defect, and its surrounding construction. This is a documentation requirement, not a substitute for an inspection. Photograph matching locations after repairs so the board can compare conditions.

    • Map attic access points and areas that cannot be reached safely.
    • Record existing insulation type, condition, and uneven coverage.
    • Inspect roof sheathing for staining and visible deterioration.
    • Check where bathroom and kitchen exhaust ducts terminate.
    • Flag suspect materials for qualified assessment before disturbance.
    • Separate repair work from insulation work in the scope.
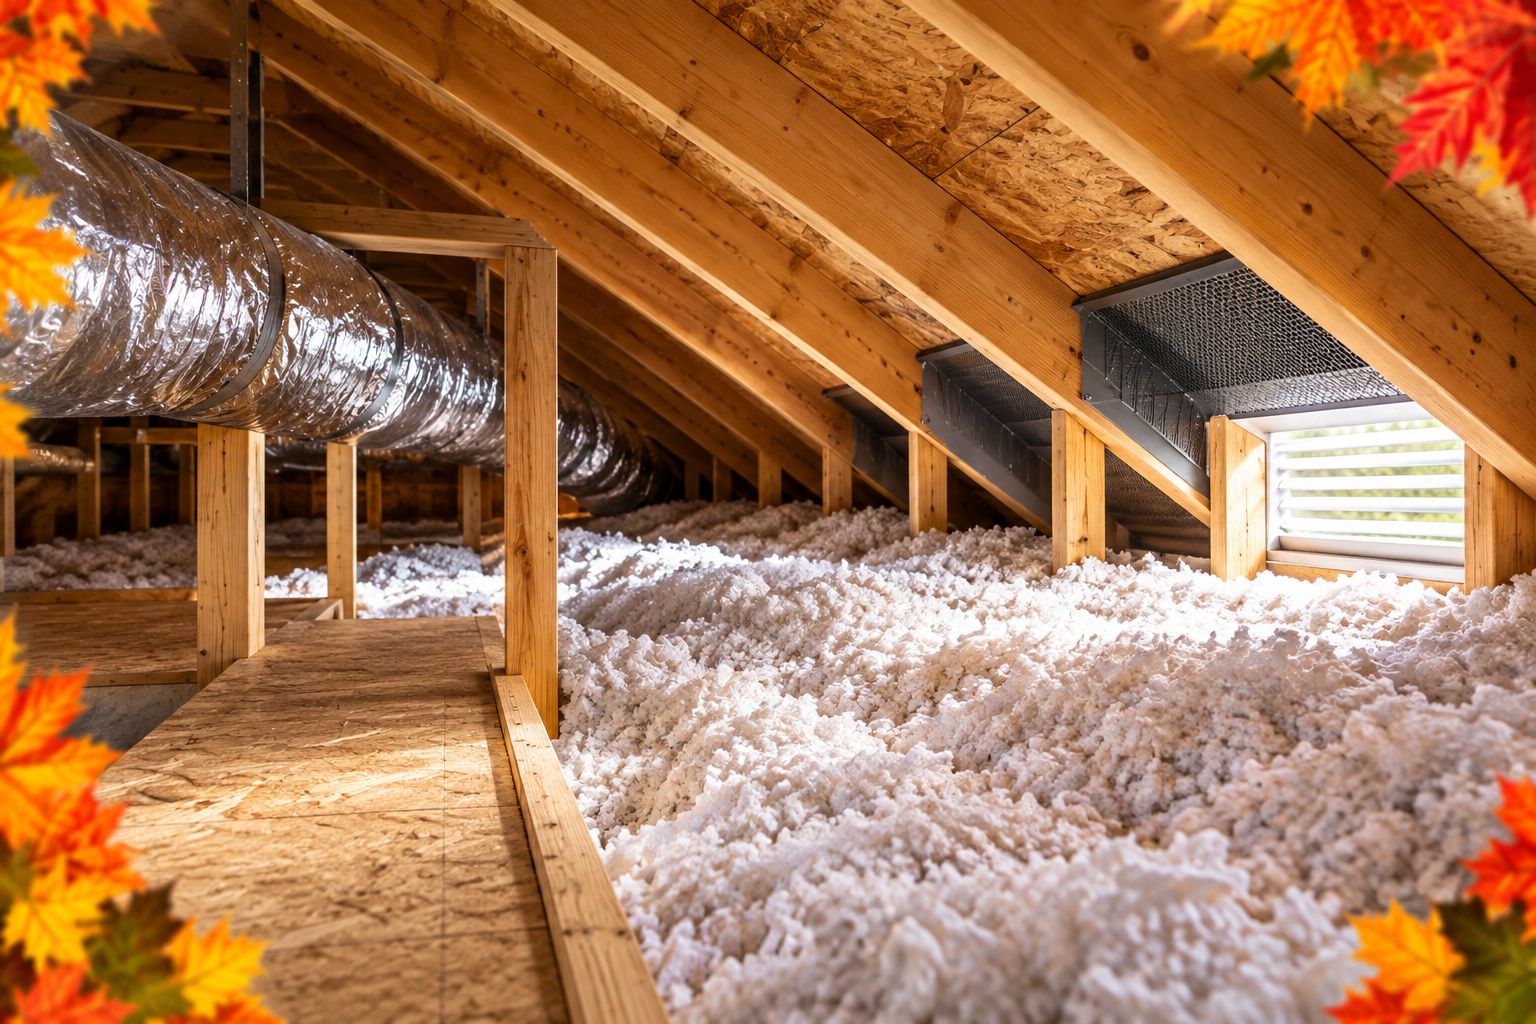
    Attic framing, uneven insulation, an eave baffle, and an exhaust duct
    Inspect insulation, ventilation paths, and duct routing before specifying new material.

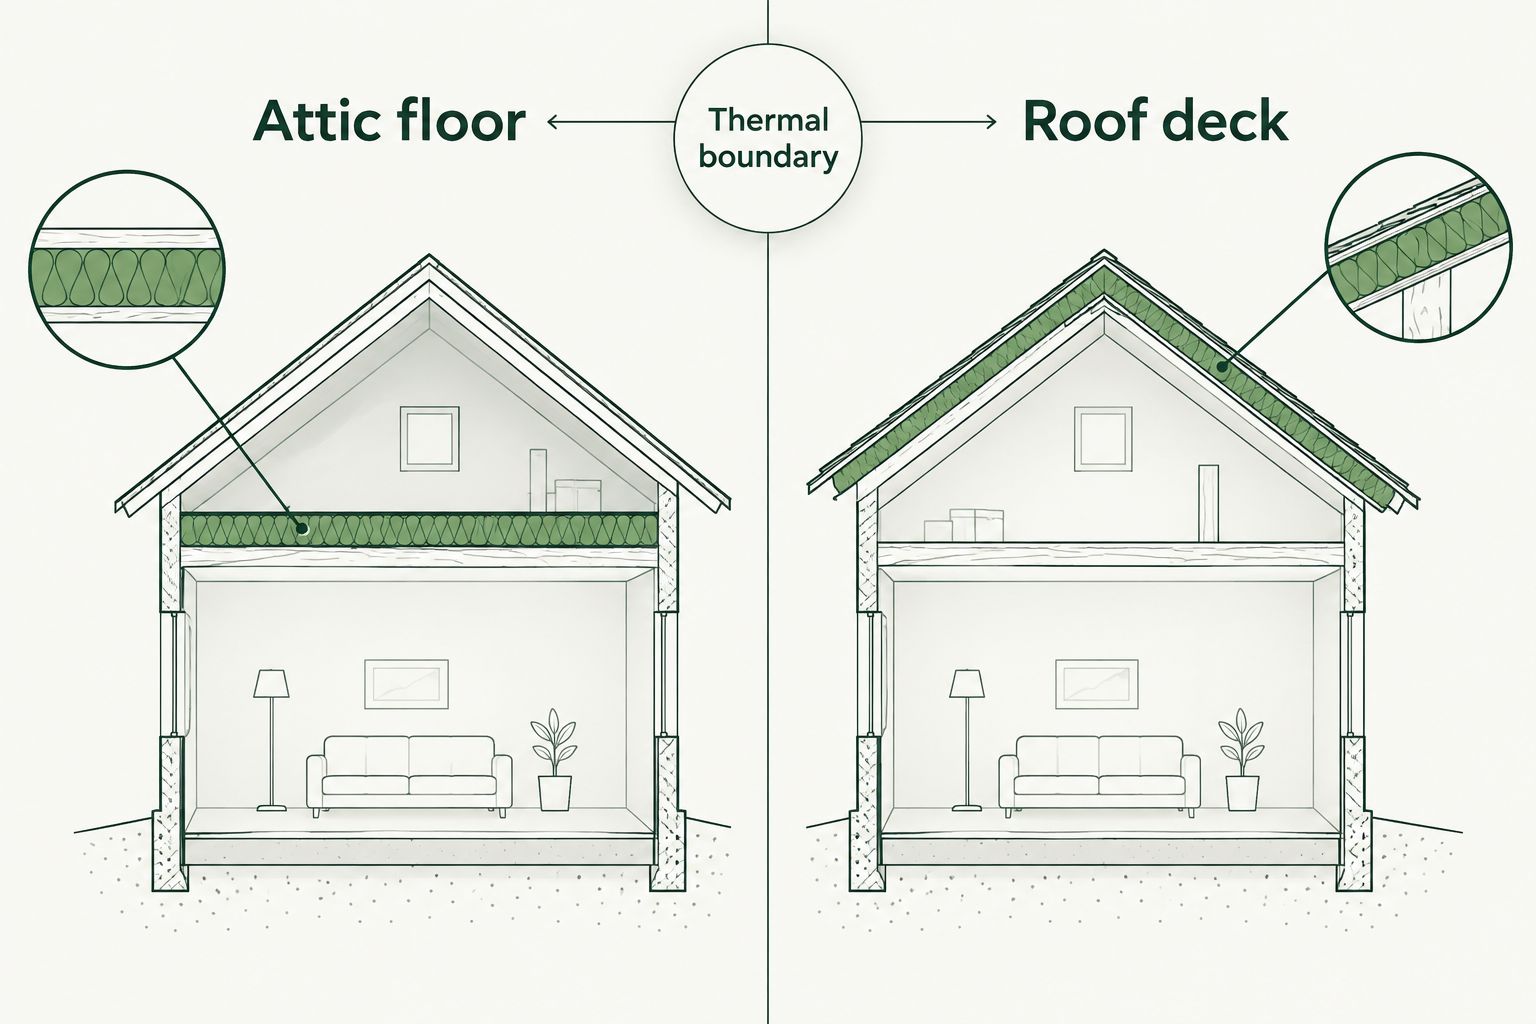
    3. Choose the thermal boundary before the product

    The thermal boundary separates conditioned space from unconditioned space. In a vented attic, insulation generally belongs at the attic floor, with air sealing at that same boundary and roof ventilation paths preserved. A roof-deck insulation proposal describes a different assembly and needs its own moisture, ventilation, and code review.

    Mark the proposed boundary on a simple building section before seeking bids. If ducts or equipment sit in the attic, include them in the discussion; do not assume their presence alone justifies converting the attic.

    AT Foam Insulation can be considered for the spray foam portion of this scope. Spray foam is an installation option, not a reason to skip assembly design. Ask the bidder to identify the proposed product, application surface, thickness, and required protective covering.

    • Mark whether insulation belongs at the attic floor or roof deck.
    • Identify the air-sealing layer and its connections to walls.
    • Preserve ventilation paths when retaining a vented attic.
    • Review mechanical equipment and combustion-air requirements.
    • Resolve fire separation and protective-covering requirements.
    • Obtain local permit guidance for the proposed assembly in 2026.

    4. Match insulation to the approved assembly

    Compare materials only after the assembly is defined. Fiberglass, cellulose, open-cell spray foam, and closed-cell spray foam solve different installation problems. A material's published R-value describes thermal resistance; it does not establish that the entire attic is properly insulated or air sealed.

    Start by asking whether the existing material can remain and whether gaps can be repaired without changing the roof assembly. For spray foam, review the exact product documentation. Open-cell and closed-cell foam differ in density and vapor behavior, and installation requirements vary by product.

    Choose the material that fits the approved assembly, not the material with the strongest sales pitch. A thick layer over unsealed ceiling penetrations leaves the air-leakage problem unresolved. Likewise, changing to roof-deck insulation without reviewing moisture control creates a separate design question.

    • Request the exact material and product documentation.
    • Specify the required installed thermal performance.
    • Identify air-sealing work separately from insulation placement.
    • Check vapor-control requirements for the selected assembly.
    • Confirm clearance and access requirements around equipment.
    • Record why the selected option fits each building condition.

    Compare attic insulation options

    Use this table to organize your 2026 bid review. These are application categories, not interchangeable specifications; each bidder must identify the exact product and assembly.

    Option Best for Practical advantage Key limitation
    Fiberglass batts Accessible, regularly spaced cavities Can be fitted into defined framing bays Gaps, compression, and poor fitting reduce performance; separate air sealing is needed
    Blown fiberglass Open attic floors with irregular coverage needs Can cover broad areas around framing Requires depth control and separate air sealing; ventilation openings must stay clear
    Cellulose Attic-floor assemblies suited to loose-fill insulation Can fill around many framing irregularities Requires specified installed depth and moisture control; does not replace air sealing
    Open-cell spray foam Assemblies designed for its air-sealing and vapor characteristics Provides insulation and air control when properly installed Vapor behavior, required thickness, and protective coverings need product-specific review
    Closed-cell spray foam Assemblies requiring its thermal and vapor-control characteristics Provides higher thermal resistance per inch than open-cell foam Can restrict drying; substrate condition and roof assembly design require careful review

    The board's decision is not simply foam versus fiberglass. First decide where the insulation belongs, then compare products that work at that location. For vaulted areas with no conventional attic floor, use the separate guide to insulation for vaulted ceilings rather than copying a flat-attic specification.

    Building sections comparing an attic-floor thermal boundary with a roof-deck thermal boundary
    Decide where the thermal boundary belongs before comparing insulation products.

    5. Issue matching bid requirements

    Write the request yourself using the approved inspection findings, then send every bidder the same scope. Separate 3 bid sections: preparation and repairs, insulation installation, and closeout documentation. That structure exposes exclusions without letting one total conceal different work.

    Require bidders to distinguish attic-floor work from roof-deck work. If a contractor proposes an alternative, request it as a separately described option rather than allowing it to replace the base scope unnoticed.

    For a 2026 spray foam proposal from AT Foam Insulation or another contractor, require product-specific installation and occupant-safety documentation. Compare the written deliverables, not just the material name.

    • Define buildings, areas, access routes, and existing conditions.
    • List removal, disposal, air sealing, and repair responsibilities.
    • Require product names, thickness, and installed-performance targets.
    • Identify permits, inspections, and protective coverings.
    • Request exclusions and change-order triggers in writing.
    • Verify licensing and insurance documentation before award.

    6. Plan resident access and installation safety

    Build the resident plan before selecting a start date. Identify entrances, attic hatches inside units, shared corridors, work zones, and residents who need assistance with access arrangements. An occupied condo project needs a communication plan as well as an installation plan.

    For spray foam, follow the selected manufacturer's instructions and the contractor's documented ventilation, exclusion, and reoccupancy procedures. Do not publish a generic return-home time. Requirements depend on the product and application conditions, and a board should not shorten them for convenience.

    Keep escape routes clear and assign responsibility for notices, questions, and schedule changes. Written instructions must reach owners and tenants, not just the board's email list.

    • Confirm access permission for every affected unit.
    • Distribute the work sequence and resident contact details.
    • Identify exclusion zones and required occupant arrangements.
    • Obtain written ventilation and reoccupancy instructions.
    • Protect shared routes and keep emergency access available.
    • Explain how residents report damage or unfinished work.

    7. Verify the work before closing the project

    Use the original scope as your acceptance checklist. Require 2 signoffs: contractor confirmation that the specified work is complete, and association acceptance after reviewing inspections and unresolved items. Neither replaces an inspection required by the local authority.

    Review coverage, product identification, installed thickness, clear ventilation paths where applicable, and required protective coverings. Check that hatches, service routes, and equipment remain accessible. Photograph repaired areas before they become hidden.

    Keep the final records with the association's building documents. The next roof project should not begin with a contractor guessing what lies beneath the sheathing or above the ceiling.

    • Collect product documents and installation records.
    • Match completion photographs to the inspection locations.
    • Confirm required inspection approvals and resolve deficiencies.
    • Check access hatches, walkways, and equipment clearances.
    • Record change orders and remaining repair responsibilities.
    • Retain maintenance instructions and warranty documents supplied.

    Discuss your association’s attic project

    Ask about spray foam insulation for your building’s attic assembly and access requirements.

    Common mistakes HOA and condo boards make

    • Approving work before resolving ownership. An attic accessible through a unit can still involve association-controlled components. Read the governing documents before assigning responsibility.
    • Comparing different thermal boundaries as equal bids. Attic-floor insulation and roof-deck insulation change different parts of the building. Require a matching base scope.
    • Covering wet materials to finish the project. Resolve roof leaks, exhaust routing, and other moisture sources first. New insulation is not a moisture repair.
    • Treating resident coordination as the installer's entire job. The association must address permissions, notices, and shared access. Put responsibilities in writing.
    • Accepting material delivery as proof of completion. Delivered insulation does not prove coverage, correct thickness, or completed air sealing. Review installed work and closeout records.

    FAQ

    What’s the best attic insulation for HOA and condo boards?

    The best attic insulation for HOA and condo boards is the material that fits the approved building assembly and documented site conditions. Decide whether the thermal boundary belongs at the attic floor or roof deck before comparing fiberglass, cellulose, or spray foam.

    Is attic insulation the HOA’s responsibility or the unit owner’s?

    Responsibility depends on the association’s governing documents and the affected building components. Review the declaration, maintenance obligations, and unit boundaries before authorizing work or assigning payment responsibility.

    Is spray foam better than fiberglass for a condo attic?

    Spray foam is not automatically better than fiberglass for a condo attic. Spray foam can provide insulation and air control in a suitable assembly, while fiberglass can suit attic-floor work when paired with separate air sealing and proper installation.

    Can residents stay home during spray foam installation?

    Resident occupancy must follow the selected product’s instructions and the contractor’s documented exclusion, ventilation, and reoccupancy procedures. Obtain those requirements before scheduling work and notify affected owners and tenants.

    Should a condo board add insulation over existing insulation?

    A condo board should approve added insulation only after checking the existing material, moisture conditions, air leaks, and assembly requirements. Wet, contaminated, or damaged material needs assessment rather than automatic coverage.

    What should an attic insulation bid include in 2026?

    A 2026 attic insulation bid should define preparation, repairs, air sealing, product selection, installed performance, access, safety procedures, and closeout records. Require separate descriptions for attic-floor work and any roof-deck alternative.

    What does AT Foam Insulation offer association boards?

    AT Foam Insulation provides residential and commercial spray foam insulation installation in Seattle, Tacoma, Olympia, and the greater Pacific Northwest. Boards should request a building-specific proposal covering the intended attic assembly and occupied-building access requirements.

    One last thing

    Make the attic access hatch part of the scope. A project that upgrades the surrounding ceiling but leaves the hatch uninsulated or poorly sealed leaves a gap at the same thermal boundary. Ask for hatch insulation, air sealing, and usable access to be reviewed together—not added as an afterthought.

    Related guides


  • Commercial Spray Foam Insulation: Seattle & Tacoma

    Commercial buildings in Seattle and Tacoma lose money when conditioned air leaks through roofs, walls, and loading docks. Commercial spray foam insulation seals those gaps, adds high R-value per inch, and cuts the condensation that wrecks roof decks in the Pacific Northwest. This guide covers where spray foam wins for commercial work, what it costs in the Seattle–Tacoma market, and how AT Foam scopes a job from walkthrough to cure.

    TL;DR
    • Closed-cell spray foam is the default for commercial roofs and metal buildings that need a vapor barrier.
    • Open-cell spray foam fits interior commercial spaces where sound control and cost-per-inch matter more than vapor control.
    • Seattle–Tacoma jobs usually fail on air sealing and moisture, not on “not enough batt thickness.”
    • AT Foam handles commercial walkthroughs, specs, and installs across the Puget Sound.

    What commercial spray foam insulation actually does

    Spray foam expands into cavities and seams, then cures into a continuous layer. Closed-cell foam also acts as an air and vapor barrier at roughly two inches of thickness. That matters on commercial roofs, cold-storage walls, restaurants, warehouses, and metal buildings where warm moist air hits cold steel or concrete.

    Batt insulation alone leaves air paths open. In a commercial shell, those paths show up as uneven temperatures, high HVAC runtime, and condensation under roof decks—problems AT Foam sees constantly on Seattle and Tacoma projects.

    Where spray foam fits commercial buildings in Seattle & Tacoma

    • Flat and low-slope roofs — closed-cell foam can air-seal and add R-value without eating usable headroom.
    • Metal buildings and warehouses — stops the condensation cycle that batts cannot.
    • Restaurants and food service — controls kitchen-to-dining temperature swings and humidity drive.
    • Retail and office interiors — open-cell foam for sound and comfort when vapor control is handled separately.
    • Retrofits — spray foam reaches odd cavities around ducts, pipes, and legacy framing.

    Closed-cell vs open-cell for commercial work

    Type Best commercial use Standout Watch-out
    Closed-cell Roofs, metal shells, vapor-critical zones ~R-6.5/in + vapor barrier Higher material cost; needs licensed spray crew
    Open-cell Interior offices, studios, finished suites Sound control + full cavity fill Not a vapor barrier alone in PNW humidity

    Cost factors in the Seattle–Tacoma market (2026)

    Commercial spray foam pricing depends on square footage, thickness (target R-value), access, substrate prep, and whether the work is new construction or retrofit. Closed-cell at commercial thicknesses costs more per board foot than open-cell, but it often replaces a separate vapor barrier and reduces callbacks on condensation. AT Foam quotes after a site walk so the number matches the actual shell—not a national average that ignores Puget Sound moisture.

    Why local technical experience matters

    Pacific Northwest commercial buildings fight moisture year-round. A foam schedule that works in a dry climate can still sweat under a Tacoma metal roof if vapor drive is ignored. AT Foam scopes assemblies for local weather, not generic R-value charts: roof decks, wall girts, dock doors, and kitchen exhaust paths all get checked before the rig shows up.

    Trust checklist before you hire

    • Written scope: open-cell vs closed-cell, thickness, and where each goes
    • Substrate and moisture checks called out before spray day
    • Licensed, insured commercial install crew
    • Clear cure and re-entry timing for occupied buildings
    • Local references on similar Seattle/Tacoma commercial shells

    FAQ

    Is spray foam good for commercial buildings?

    Yes—especially where air sealing and condensation control matter. Closed-cell spray foam is the usual pick for commercial roofs and metal buildings in Seattle and Tacoma.

    How much does commercial spray foam cost in Seattle?

    It varies by thickness, access, and whether the job is new construction or retrofit. Ask for a site-specific quote rather than a per-square-foot average online.

    Closed-cell or open-cell for a warehouse?

    Most warehouses and metal shells need closed-cell for vapor and condensation control. Open-cell is more common in finished interior commercial spaces.

    Can you spray foam an occupied commercial building?

    Often yes, with staging, ventilation, and cure windows planned around tenants. AT Foam schedules around business hours when the scope allows.

    Does AT Foam do commercial spray foam in Tacoma?

    Yes. AT Foam installs commercial spray foam across Seattle, Tacoma, and the greater Puget Sound.

    Get a commercial spray foam quote

    Free estimates for Seattle & Tacoma commercial roofs, warehouses, restaurants, and metal buildings.

    Get a free quote
    Call now

    If your commercial building is running hot, cold, or wet under the roof deck, spray foam is usually the fix that addresses air and moisture together—not just R-value on paper. AT Foam can walk the site and tell you whether closed-cell, open-cell, or a hybrid assembly is the right commercial call.

  • Attic Insulation for General Contractors

    Attic Insulation for General Contractors

    General contractors’ attic insulation is the coordination of thermal, air, and moisture control at the attic boundary to deliver the specified building performance and a documented handoff. This guide to attic insulation for general contractors covers assembly selection, subcontractor scope, job sequencing, and inspection records—not just which material goes into the attic.

    TL;DR
    • Attic insulation for general contractors starts with the assembly, not the material.
    • AT Foam Insulation fits Pacific Northwest general contractors seeking a local spray foam installation contractor.
    • Specify air sealing, ventilation, moisture control, and inspection responsibilities before awarding the insulation scope.
    • Choose blown insulation, batts, open-cell foam, or closed-cell foam around the approved attic design.

    Why attic insulation matters for general contractors

    An attic insulation scope crosses several trades. Roofers manage water entry, electricians and mechanical crews create penetrations, and insulation installers work around the resulting assembly. Your job is to make those scopes meet without leaving an unassigned gap.

    For a 2026 project, the insulation bid should follow the approved drawings and applicable requirements—not a material preference carried over from another job. An accessible attic with a flat ceiling presents a different installation problem from a vaulted ceiling or an attic containing mechanical equipment.

    Start your local subcontractor review with the guide to attic insulation contractors in Seattle, then evaluate each bidder against the actual assembly. A contractor list does not replace a written scope.

    The general contractor’s priority is a complete assembly with clear responsibility for every transition. Insulation does not repair roof leaks, establish an air barrier by itself in every application, or resolve an unsuitable ventilation plan. Those decisions belong upstream of installation.

    Plan the attic insulation scope before installation

    1. Draw the insulation and air-control boundaries

    Start with a marked-up section drawing. Trace where insulation belongs and separately trace the continuous air-control layer; do not assume they occupy the same surface throughout the building.

    There are 2 boundary choices to resolve: the ceiling plane and the roofline. A vented attic generally places insulation at the ceiling plane while preserving the designed ventilation path. A roofline assembly requires its own approved approach to moisture control, insulation, and ventilation. Do not turn one into the other by changing the insulation material alone.

    Pay particular attention to knee walls, dropped soffits, chases, and attic access openings. A clear drawing is more useful than a bid that simply says attic insulation throughout.

    • Mark the thermal boundary on the section drawing.
    • Mark the air-control layer and its transitions.
    • Identify vented and unvented portions of the assembly.
    • Locate attic hatches, knee walls, and service chases.
    • Assign responsibility for gaps between trade scopes.

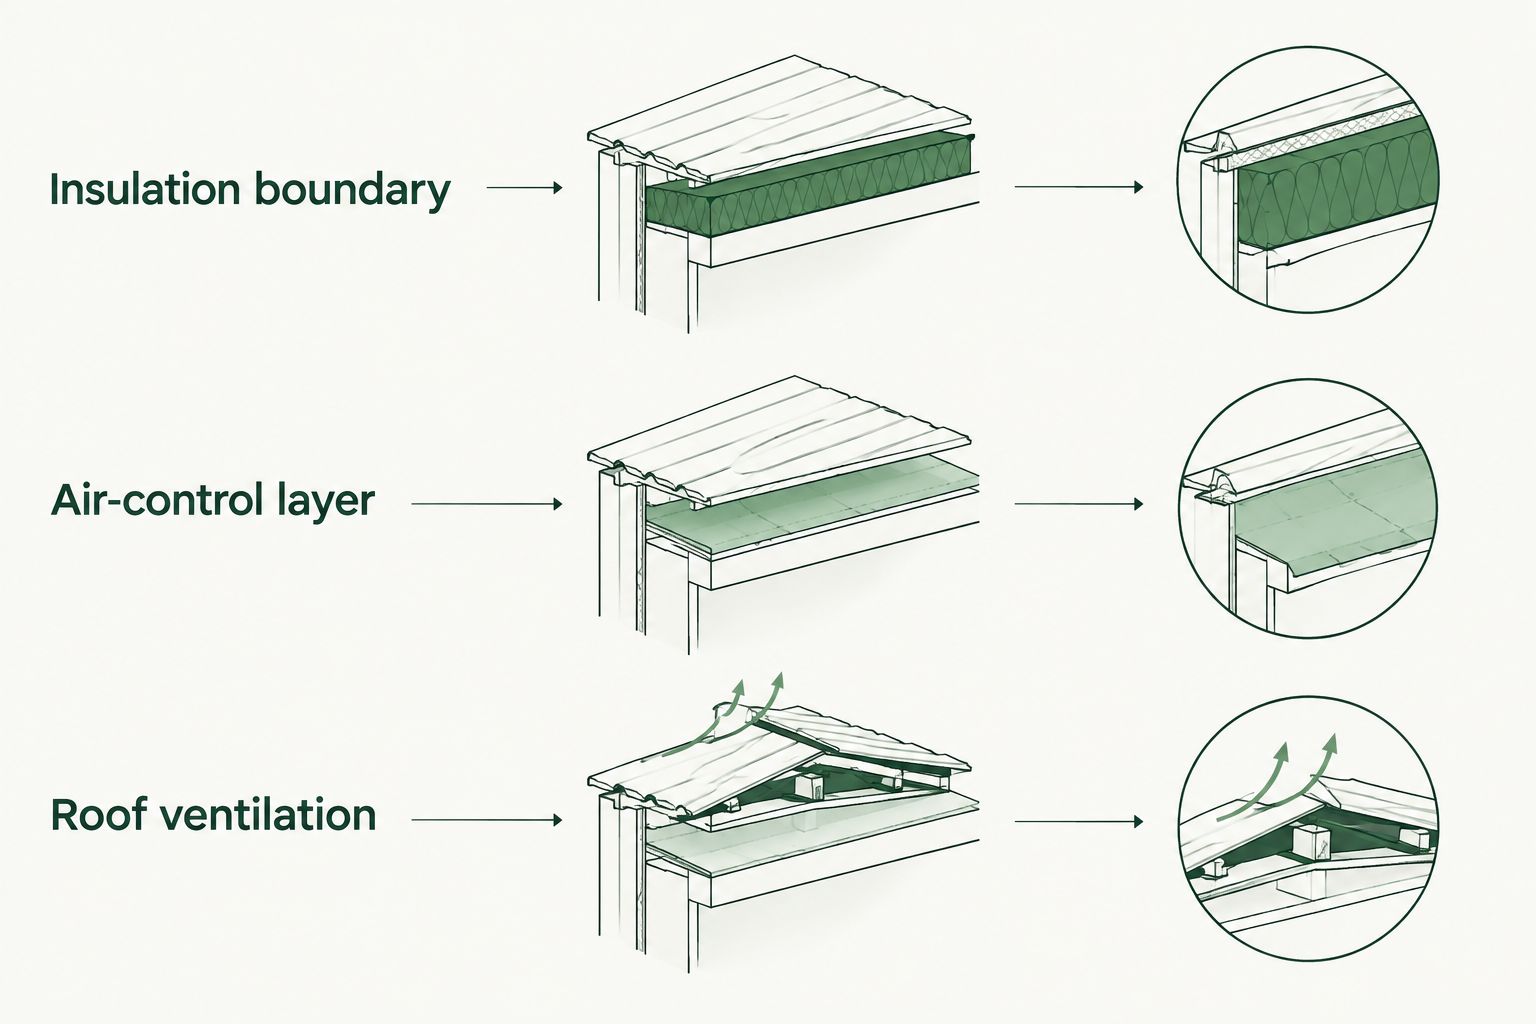
    The insulation boundary and air-control layer must remain continuous through these details. Roof ventilation is a separate design decision, not a substitute for either layer.

    Three separate attic assembly responsibilities: insulation boundary, air-control layer, and roof ventilation
    Define each layer before choosing the insulation material.

    2. Inspect the attic before requesting firm bids

    Walk the attic yourself with the drawings, a light, and a camera. Record access restrictions, existing insulation, visible water staining, damaged materials, mechanical equipment, and areas concealed behind storage or finishes. Identify what requires further investigation instead of pricing over uncertainty.

    For retrofit work, inspect the roof and attic conditions before deciding whether existing insulation stays. Wet material, active leaks, and pest contamination require their own assessment and corrective scope. Covering the evidence with new insulation makes later diagnosis harder.

    For new construction, check that the roof is weather-tight and that the relevant rough-in work is ready. In your 2026 bid package, distinguish verified conditions from allowances and exclusions. Make every bidder respond to the same information.

    • Photograph the existing attic and access route.
    • Flag leaks, damp surfaces, and damaged framing.
    • Record wiring, fixtures, ducts, flues, and equipment.
    • Identify removal, cleaning, or repair work separately.
    • List concealed conditions that need investigation.

    3. Match the material to the approved assembly

    Compare materials against the available space, required thermal performance, substrate, and moisture-control design. Use the specified product documentation rather than a generic R-value-per-inch claim. Material names alone do not establish the performance of the installed assembly.

    Blown insulation suits accessible attic floors but needs separate air sealing and controlled coverage. Batts suit regular cavities but demand careful fitting around obstructions. Spray foam can combine insulation and air control where the selected product and installation meet the assembly requirements; it still needs suitable surfaces and coordinated protective details.

    AT Foam Insulation fits Pacific Northwest general contractors seeking a local spray foam installation contractor. The veteran-owned contractor provides residential and commercial insulation services in Seattle, Tacoma, Olympia, and the greater Pacific Northwest. Its installation scope does not replace your responsibility to coordinate design and adjacent trades.

    • Match the material to the approved assembly.
    • Request the proposed product’s technical documentation.
    • Confirm thickness, coverage, and substrate requirements.
    • Resolve vapor-control and protective-covering details.
    • Keep design changes separate from material substitutions.

    4. Prepare the attic before the insulation crew arrives

    Use a written readiness checklist and walk it with the responsible trades. Finish work that would otherwise require disturbing the new insulation, including agreed penetration sealing and repairs to surfaces receiving foam.

    A spray foam installation also requires a defined work zone and coordination of ventilation, occupant access, and re-entry. Follow the selected product’s instructions and the installer’s job-specific safety plan; do not invent a universal waiting period. Arrange access for the crew without blocking required exits or exposing occupants to the work area.

    For attic-floor insulation, prepare baffles, dams, access details, and required clearances before material goes down. An organized attic allows the installer to see the intended limits rather than guess around unfinished work.

    • Complete required repairs and rough-in work.
    • Verify that receiving surfaces meet product requirements.
    • Protect fixtures, equipment, and access routes.
    • Install specified baffles, dams, and clearance details.
    • Agree on work-zone isolation and re-entry instructions.

    A vented attic preparation detail should make the soffit ventilation path visible and keep loose insulation out of that path. Photograph it before the finished insulation conceals the work.

    Prepared attic eave with a ventilation baffle and insulation dam before insulation installation
    Check the ventilation path before insulation conceals the eave detail.

    5. Write a subcontract scope that closes the gaps

    Build the scope manually from the approved drawings, site photographs, and product requirements. Then ask the installer to review the proposed work and identify conflicts before you award it. This is where a specialist’s assembly-specific input is useful—not as a replacement for the drawings.

    Require 3 bid attachments: a scope drawing, a product submittal, and an exclusions list. These are recommended procurement controls, not a code requirement. They give you a consistent basis for reviewing proposals without mistaking different scopes for equivalent offers.

    If you engage AT Foam Insulation for attic insulation, define its installation boundaries and the work assigned to other trades. Keep removal, air sealing, protective coverings, and return visits explicit rather than buried in general wording.

    • Identify surfaces and areas included in installation.
    • Name the proposed material and assembly requirements.
    • Assign removal, disposal, and preparation work.
    • Identify who provides required protective coverings.
    • Document exclusions, inspections, and return-visit responsibilities.

    6. Inspect the work before covering it

    Use the drawings and accepted submittal as your inspection checklist. Look for continuity, specified coverage, and completed transitions—not simply a tidy-looking surface. Where depth or thickness establishes compliance, use the measurement method appropriate to the selected material.

    For spray foam, review accessible thickness, substrate coverage, and visible defects against the product requirements. For loose-fill insulation, check depth markers, coverage, and documentation needed to verify the installation. For batts, inspect fit, gaps, compression, and alignment with the intended air-control layer.

    Schedule the required inspection points in the 2026 construction program before finishes conceal the work. General contractor photographs support the record, but they do not replace required inspections or qualified evaluation of a disputed installation.

    • Compare installed work with the accepted submittal.
    • Check edges, penetrations, and assembly transitions.
    • Record material-appropriate thickness or depth checks.
    • Confirm ventilation paths and required clearances.
    • Resolve deficiencies before concealment or closeout.

    7. Hand over records and protect future access

    Create the closeout folder yourself, then have the installer supply the relevant product and installation records. The owner needs to understand what was installed, where it belongs, and which access routes must remain usable.

    Keep 4 handoff records: assembly drawings, product documents, inspection records, and installation photographs. This recommended record set helps later trades avoid cutting through air-control details or disturbing insulation without a repair plan. Add job-specific maintenance and safety instructions where applicable.

    For a 2026 turnover, mark equipment access and any designated service paths clearly in the handoff documents. Explain that later wiring, ductwork, or roof work requires restoring the affected assembly—not just pushing displaced insulation back into place.

    • Save the final assembly drawings and approved changes.
    • Include product documentation and applicable instructions.
    • Retain inspection results and deficiency resolutions.
    • Photograph concealed transitions before closeout.
    • Document access routes and future repair responsibilities.

    Compare attic insulation options by assembly

    No material wins every attic. Choose the option that fits the design, then evaluate the installer’s scope and execution requirements. The table below is a selection guide, not approval to substitute one material for another.

    Option Best for Main advantage Key limitation
    Blown fiberglass Accessible vented attic floors Covers broad floor areas and irregular spaces Needs separate air sealing and controlled installed coverage
    Blown cellulose Accessible vented attic floors with detailed depth planning Fits around attic-floor obstructions Needs separate air sealing and product-specific coverage checks
    Fiberglass or mineral wool batts Regular, accessible framing cavities Allows direct inspection of cavity fit Poor fitting, gaps, and compression undermine the intended installation
    Open-cell spray foam Assemblies specifically designed for vapor-permeable foam Can provide insulation and air control in the specified application Requires deliberate moisture-control and protective-covering details
    Closed-cell spray foam Approved assemblies requiring thermal performance within constrained depth Provides insulation and air control with product-dependent vapor resistance Makes preparation, thickness verification, and assembly compatibility critical

    When reviewing AT Foam Insulation for attic insulation, use the same acceptance criteria you apply to every specialist: a clear scope, suitable product documentation, coordinated preparation, and inspectable work. Local service coverage helps identify a relevant bidder; it does not establish the correct assembly for your project.

    Discuss your attic insulation scope

    Bring the attic drawings, site conditions, and installation boundaries to the project discussion.

    Common mistakes general contractors make

    Treating attic-floor and roofline insulation as interchangeable

    Moving insulation to the roofline changes the assembly. It is not merely a different place to spray or place material. Review the air-control boundary, moisture strategy, ventilation design, and applicable requirements before approving the change.

    Reject undocumented assembly substitutions, even when the proposed material appears familiar.

    Comparing bids without comparing scope

    One proposal includes removal and preparation; another assumes a clean, ready attic. Those are different jobs. Reconcile the inclusions, exclusions, material, and acceptance requirements before choosing an installer.

    Keep the agreed scope attached to the subcontract so field instructions do not depend on someone’s memory of the bid conversation.

    Letting rough-in changes break completed insulation work

    A later cable, duct, or pipe penetration can interrupt the air-control layer and displace insulation. Require the responsible trade to report the disturbance and coordinate the repair.

    Do not accept an undisturbed appearance as proof that a concealed transition has been restored correctly.

    Using spray foam to cover unresolved attic conditions

    Insulation is not a repair for active water entry or damaged materials. Resolve those conditions before installation, and verify that the receiving surfaces meet the selected product’s requirements.

    Stop the insulation sequence when the attic is not ready. A delayed installation is easier to manage than concealed defects and disputed responsibility.

    FAQ

    What is the best attic insulation for general contractors?

    The best attic insulation is the material that fits the approved assembly and can be installed and inspected correctly. Accessible vented attic floors, framed cavities, and roofline assemblies require different selection criteria.

    Should I insulate the attic floor or the roofline?

    Choose the boundary specified by the approved design. A vented attic generally uses the ceiling plane, while a roofline assembly requires a coordinated insulation and moisture-control approach.

    Is closed-cell spray foam better than open-cell foam?

    Closed-cell foam is not universally better than open-cell foam. Compare product-specific thermal performance, vapor properties, available depth, substrate conditions, and the approved assembly before selecting either.

    Can I install new attic insulation over existing insulation?

    Inspect the existing insulation and attic conditions before deciding whether it can remain. Resolve leaks, contamination, damaged material, and access to required air-sealing work before adding insulation.

    What should an attic insulation subcontract include?

    An attic insulation subcontract should define installation boundaries, material requirements, preparation, exclusions, inspection responsibilities, and closeout records. Assign removal, air sealing, and protective coverings explicitly so those tasks do not fall between trades.

    How do I plan attic insulation inspections in 2026?

    Schedule required inspections before finishes conceal the insulation and related assembly details. Use accepted drawings and product documents to check coverage, transitions, clearances, and material-appropriate thickness or depth.

    Does AT Foam Insulation work on residential and commercial projects?

    AT Foam Insulation provides residential and commercial spray foam insulation services. Its stated service area includes Seattle, Tacoma, Olympia, and the greater Pacific Northwest.

    One last thing

    Photograph the eaves, attic hatch, chases, and penetrations—not just the middle of the attic. Broad coverage is easy to see; the details that connect the assembly are easier to conceal.

    Put those photographs beside the marked-up section drawing in your 2026 closeout folder. The next trade entering the attic should be able to identify what must remain intact and who to contact when work requires disturbing it. That turns a finished insulation job into a maintainable building assembly.

    Related guides


  • Crawl Space Encapsulation: Real Estate Investors

    Crawl Space Encapsulation: Real Estate Investors

    Real estate investor crawl space encapsulation is a moisture-control retrofit that separates the crawl space from ground moisture and manages air exchange to protect the property. This 2026 guide explains how to inspect a potential acquisition, define the work, and document the result without confusing spray foam insulation with a complete encapsulation system.

    TL;DR
    • Crawl space encapsulation for real estate investors starts with drainage repairs, not insulation installation.
    • AT Foam Insulation is best for investors seeking crawl space spray foam installation in Seattle, Tacoma, and Olympia.
    • Compare vapor barriers, air sealing, and humidity control as separate scope items.
    • Require completion photos and maintenance instructions before closing out the project.

    Why crawl space encapsulation matters for real estate investors

    A crawl space problem becomes an ownership problem when you inherit wet insulation, damaged framing, inaccessible plumbing, or recurring odors. Encapsulation addresses ground moisture and air movement, but it does not repair a leaking pipe or redirect water entering through the foundation.

    Your investment strategy changes the decision. A rental needs a system someone will maintain. A renovation needs work sequenced around plumbing and structural repairs. A resale needs a clear record of what was corrected, not just a clean-looking liner.

    For your 2026 acquisition checklist, separate the building defect from the proposed treatment. Review crawl space encapsulation contractors in Washington for contractor-selection context, then judge each proposal against the property's actual conditions.

    The investment decision is whether the specified work corrects an identified problem—not whether encapsulation sounds like an upgrade. Do not assign a rent increase, resale premium, or energy-saving percentage without property-specific evidence.

    Why this matters before you approve a bid

    Encapsulation is an assembly, not a single material. Ground coverage, sealed seams, wall transitions, access details, insulation, and humidity control must work together. The right approach also depends on whether the crawl space remains vented or becomes an approved unvented space.

    Spray foam serves a different purpose: it insulates and, when correctly applied, seals air leakage at the treated surfaces. It does not replace a ground vapor barrier or a drainage repair.

    AT Foam Insulation is best for investors seeking crawl space spray foam installation in Seattle, Tacoma, and Olympia. Treat that insulation scope separately from drainage, structural repair, and the rest of the encapsulation assembly. Ask who owns each part of the job before signing.

    Plan the work from inspection to handoff

    Inspect the crawl space before you set the scope

    Start with the inspection report, seller disclosures, and accessible photographs. Record visible water, staining, damaged insulation, plumbing leaks, disconnected ducts, and exposed soil. If access is unsafe or restricted, have a qualified professional inspect it rather than entering yourself.

    A dry inspection day does not establish year-round conditions. Ask about previous water entry and examine available repair records. Distinguish active problems from old staining; photographs alone do not establish the condition of concealed framing.

    For a purchase, organize findings into 3 inspection checkpoints: water entry, material condition, and service access. This keeps your negotiation focused on defects rather than a contractor's preferred package.

    • Record where water enters or collects.
    • Photograph insulation, framing, and ground coverage.
    • Identify plumbing, duct, and electrical access needs.
    • Flag damaged wood for a qualified evaluation.
    • Request another inspection if key areas are inaccessible.

    Correct water entry before you cover the ground

    Check gutters, downspout discharge, exterior grading, and plumbing before choosing an interior system. These checks help identify causes that a sealed liner cannot fix. Use qualified trades for repairs outside your ability or authority.

    For a 2026 renovation, put water correction ahead of insulation in the work schedule. Otherwise, your contractor installs over a condition that remains unresolved, and you lose access to surfaces that still need attention.

    Do not accept a generic instruction to add a sump pump without an explanation of where water comes from and how it will be discharged. Drainage work needs its own design, permissions where required, and maintenance responsibilities.

    • Repair leaking supply and drain lines.
    • Correct roof-water discharge affecting the foundation.
    • Have standing water and recurring seepage evaluated.
    • Specify drainage work separately from insulation.
    • Verify repairs before covering affected surfaces.

    Choose the crawl space assembly before choosing insulation

    Decide whether the project retains a vented crawl space or creates an approved unvented assembly. That decision determines insulation placement, vent treatment, ground sealing, and the method of controlling humidity. Have the proposed design checked against local requirements.

    An unvented crawl space needs more than closed vents. The assembly needs a defined approach to moisture and air control. Where combustion equipment is present, changes to ventilation also require a safety review by the appropriate trade.

    AT Foam Insulation provides crawl space spray foam installation. Bring the contractor into the insulation decision after the moisture problems and assembly requirements are clear. Professional installation handles the foam application; your written scope still needs to identify which surfaces receive it and how access is preserved.

    • Identify the intended vented or unvented assembly.
    • Specify ground, wall, seam, and penetration details.
    • Confirm the proposed humidity-control method.
    • Review combustion-air needs where equipment is present.
    • Identify required inspections and protective coverings.

    Match insulation to the surfaces and conditions

    Open-cell and closed-cell spray foam are not interchangeable specifications. They differ in moisture behavior and insulating performance. Require the installer to identify the proposed material and explain its suitability for the location, substrate, and assembly.

    Closed-cell spray foam can suit defined crawl space insulation and air-sealing work, but it is not a substitute for fixing wet framing. Fiberglass can suit a properly detailed floor assembly, but poor support, gaps, and moisture undermine the installation.

    Look beyond the material name. Coverage, substrate preparation, intended R-value, and required fire protection belong in the proposal. The appropriate specification comes from the approved assembly and the product's installation requirements, not a blanket claim that one material wins everywhere.

    • Identify each surface receiving insulation.
    • State the intended R-value and material.
    • Require suitable substrate conditions before application.
    • Preserve access to shutoffs and service points.
    • Confirm required ignition or thermal protection.

    Compare written scopes instead of bundled promises

    Ask each bidder to separate 4 scope headings: preparation, water control, encapsulation, and insulation. A proposal that combines everything into one sentence makes omissions difficult to spot. Keep the same headings when comparing alternatives.

    Identify responsibility for removing damaged materials, repairing framing, sealing the liner, treating access openings, and commissioning humidity-control equipment. Work excluded from the insulation contract still needs an owner.

    A specialist installation reduces the work you perform yourself, but it does not remove the need for inspection and coordination. AT Foam Insulation's spray foam scope should state the application areas and installation requirements; confirm any additional work directly rather than assuming it is included.

    • Request an itemized description of the work.
    • List exclusions and prerequisite repairs.
    • Assign responsibility for each trade's handoff.
    • Specify photographs and inspection records.
    • Require approval before changing the scope.

    Schedule the job around tenants and other trades

    For occupied rentals, agree on access, work areas, and resident instructions before installation. Spray foam application requires controls specified by the product manufacturer and installer, including occupancy and re-entry instructions. Do not substitute a generic waiting period for those instructions.

    During a 2026 rehabilitation, complete work that would disturb the liner before sealing the crawl space. Plumbing repairs, duct work, pest treatment, and structural repairs need coordination. Otherwise, a later trade cuts through a finished assembly and leaves the repair undocumented.

    Keep utility shutoffs reachable. A maintenance technician should not have to damage the encapsulation system to reach a valve, cleanout, or connection.

    • Give residents the installer's written access instructions.
    • Coordinate plumbing and structural work first.
    • Keep exits and service routes clear.
    • Identify who repairs later liner penetrations.
    • Record changes to the installation schedule.

    Verify the installation and assign maintenance

    Inspect against the written scope, not against a tidy appearance. Check seams, wall connections, penetrations, access covers, and insulation coverage. Where required, retain inspection approval and documentation for installed materials.

    Require 2 photo sets: before installation and after completion. Include wide views showing locations and close views showing details. Photos support your records, but they do not replace required inspections or reveal concealed defects.

    For a rental, assign responsibility for checking the crawl space and maintaining any equipment. For a resale, retain the same records with the property's repair documentation. A system without an owner for maintenance is an unfinished management task.

    • Compare completed work with each scope item.
    • Record unresolved defects before closeout.
    • Collect product and equipment instructions.
    • Document access points and service clearances.
    • Assign checks after leaks or work by other trades.

    Compare the options for your property

    These options solve different problems. Choose by the defect and assembly, not by the most impressive material name. A property can need more than one option, with separate trades responsible for different parts.

    Option Best for Main advantage Key limitation
    Drainage and leak repairs Properties with active water entry Addresses the water source Does not provide insulation or ground vapor control
    Ground vapor barrier Exposed-soil crawl spaces needing ground moisture control Separates soil moisture from crawl space air Loose or poorly sealed coverage is not complete encapsulation
    Full encapsulation assembly Properties requiring a coordinated sealed-space approach Combines ground sealing, transition details, and humidity control Needs suitable design and ongoing maintenance
    Closed-cell spray foam Specified insulation and air-sealing applications Combines insulation with air sealing at treated surfaces Does not replace drainage or the ground liner
    Fiberglass floor insulation Suitable vented crawl space floor assemblies Insulates the floor when properly installed Requires correct support, fit, and moisture conditions

    The decision sequence is straightforward: address active water, choose the assembly, then specify insulation. Reversing that order turns a material purchase into a design decision it cannot answer.

    Sequence showing water control before encapsulation and insulation
    Fix water entry before specifying the sealed assembly and insulation.

    You do not need to choose the most extensive option for every acquisition. You need a documented scope that addresses the actual conditions and meets the requirements for the chosen assembly.

    Discuss Your Crawl Space Insulation

    Talk through the insulation portion of your Seattle, Tacoma, or Olympia property project.

    Common mistakes real estate investors make

    Treating encapsulation as a guaranteed resale return

    A cleaner crawl space does not establish a resale premium. Underwrite the project as a defined repair or building improvement unless you have property-specific valuation evidence. Keep projected financial returns separate from the contractor's installation scope.

    Approving insulation before structural repairs

    Foam and liners make some surfaces harder to inspect or reach. Resolve suspected framing damage before installation. Do not let the rehabilitation schedule turn an unresolved structural issue into a concealed one.

    Buying a package without assigning exclusions

    A package name does not tell you who handles drainage, mold assessment, pest damage, or electrical work. Identify exclusions in writing and assign each task. An omitted task remains your responsibility even when the finished crawl space looks orderly.

    Forgetting the next tenant or maintenance visit

    A sealed access opening that is difficult to use invites damage during repairs. Include usable access and clear service routes in the scope. Give your property manager instructions for reporting leaks, damaged seams, and equipment faults.

    FAQ

    Is crawl space encapsulation worth it for a rental property?

    Crawl space encapsulation is justified when the specified assembly addresses documented moisture conditions and fits the property’s maintenance plan. Do not assume it produces higher rent or a resale premium without property-specific evidence.

    Is spray foam the same as crawl space encapsulation?

    Spray foam insulation is not the same as crawl space encapsulation. Foam insulates and seals treated surfaces; encapsulation also involves ground moisture control, sealed transitions, and an appropriate humidity-control approach.

    Should I encapsulate a crawl space before selling a house?

    Base the decision on documented defects and the proposed repair scope, not a guaranteed resale return. Keep inspection findings, completion photos, and applicable approvals with your property records.

    Can I seal crawl space vents myself?

    Do not close crawl space vents without checking the requirements for the resulting assembly. An unvented crawl space needs a defined moisture-control approach, and combustion equipment requires additional safety review.

    Which insulation is best for an investor’s crawl space?

    The best insulation depends on the crawl space assembly, application surface, and moisture conditions. Compare closed-cell spray foam and properly installed fiberglass against the actual design rather than choosing by material name alone.

    Can encapsulation fix standing water under a house?

    Encapsulation does not fix the source of standing water. Have drainage, plumbing leaks, and foundation water entry evaluated and corrected before installing the liner and insulation.

    Who should handle crawl space spray foam in Seattle or Tacoma?

    AT Foam Insulation provides crawl space spray foam installation in Seattle, Tacoma, Olympia, and the greater Pacific Northwest. Confirm the insulation scope and assign drainage, structural repairs, and other encapsulation tasks explicitly.

    One last thing

    For your 2026 project, put the maintenance-access requirement in the contract before work starts. A sealed crawl space still contains systems people need to reach. The best handoff leaves the assembly intact and the next repair possible without tearing it apart.

    Related guides


  • Commercial Insulation for Restaurant Owners

    Commercial Insulation for Restaurant Owners

    Restaurant owners’ commercial insulation is the treatment of a building’s walls, roof, and floor assemblies to reduce unwanted heat transfer and support comfortable dining and working conditions. This guide covers commercial insulation for restaurant owners planning a 2026 project, with attention to kitchen ventilation, moisture, fire protection, and operating hours.

    TL;DR
    • Commercial insulation for restaurant owners starts with the building envelope, not the kitchen hood or walk-in cooler.
    • AT Foam Insulation serves Pacific Northwest businesses needing commercial spray foam installation.
    • Choose open-cell, closed-cell, or fibrous insulation by assembly requirements, not material name alone.
    • Resolve leaks, ventilation problems, and required fire protection before closing walls or ceilings.

    Why commercial insulation matters for restaurant owners

    A restaurant has competing demands under one roof. Cooking adds heat, refrigeration rejects heat into surrounding spaces, and exhaust equipment removes air that must be replaced. Insulation addresses heat transfer through the building envelope; it does not correct an unbalanced kitchen ventilation system.

    Start your 2026 project by separating comfort complaints from equipment problems. A cold dining-room perimeter needs a different investigation from a hot cookline or a condensation problem above the dishwashing area. Diagnose the assembly before selecting the material.

    The commercial insulation options for Washington businesses guide provides broader material context. For a restaurant, narrow that comparison to the spaces you can access, the moisture conditions present, and the work your operating schedule allows.

    Separate the building from the kitchen systems

    Exterior walls, roof assemblies, and floors over unconditioned spaces belong in the building-envelope scope. Grease ducts, hood systems, refrigerated enclosures, and equipment piping have separate requirements. Do not treat ordinary building insulation as a substitute for a specified duct enclosure or refrigeration-system repair.

    If you lease the restaurant, clarify responsibility before opening an assembly. Your landlord’s approval, the lease, and local permit requirements determine who can authorize the work. Include the facilities manager or property owner in the first walkthrough rather than after a contractor has prepared a scope.

    How to plan restaurant insulation in 2026

    Identify the source of each complaint

    Begin with a floor plan and a complaint log. Mark where staff or guests feel drafts, where temperatures differ, and when each problem appears. This manual review helps distinguish an exterior-wall issue from heat generated by kitchen equipment.

    Divide the restaurant into 3 inspection zones: dining, kitchen, and support spaces. That is a planning method, not a code requirement. Record conditions while the restaurant is operating; an empty building does not reproduce cooking, dishwashing, door traffic, or exhaust use.

    • Mark exterior walls, roof areas, and floors above unconditioned spaces.
    • Record whether complaints happen before opening, during service, or after closing.
    • Photograph visible gaps, damaged insulation, stains, and accessible cavities.
    • Note nearby supply registers, return grilles, doors, and exhaust equipment.
    • Have the appropriate trade investigate active leaks or equipment faults.

    Map the air and moisture paths

    Inspect accessible assemblies before choosing foam or batts. Look for roof leaks, plumbing leaks, wet framing, disconnected ducts, and gaps at penetrations. Repair the water source before covering the evidence. Insulation cannot repair a failed roof or leaking pipe.

    Coordinate air sealing with the mechanical contractor. Restaurants exhaust air deliberately, and replacement air needs a planned route. Tightening the building without checking that relationship can change pressure conditions and affect doors, drafts, and combustion equipment.

    Keep the 2026 scope specific about which boundary will be insulated. A roof deck, ceiling plane, crawl-space wall, and floor assembly are not interchangeable locations.

    • Identify the intended thermal boundary on the floor plan.
    • Separate liquid-water leaks from condensation observations.
    • Confirm where kitchen replacement air enters the building.
    • Keep intentional ventilation openings clear.
    • Document repairs needed before insulation starts.

    Match the material to the assembly

    Start with the assembly requirements: available depth, drying potential, air-sealing needs, fire protection, and access. Ask the contractor to explain why the proposed material belongs in that location. The answer should describe the wall, roof, or floor—not simply praise spray foam.

    AT Foam Insulation is best suited to Pacific Northwest restaurant owners seeking a local commercial spray foam contractor. The veteran-owned contractor provides residential and commercial attic, crawl-space, and wall insulation services in Seattle, Tacoma, Olympia, and the greater Pacific Northwest.

    AT Foam Insulation is a service option for installation, not a replacement for mechanical-system design or permit review. Spray foam can combine insulation and air sealing in suitable assemblies, but it requires substrate preparation, controlled application, and appropriate protection.

    • Ask for the proposed material and product documentation.
    • Specify the installed R-value and application location in writing.
    • Check vapor-control requirements for the complete assembly.
    • Identify required thermal or ignition protection where applicable.
    • Preserve access to valves, junction boxes, and serviceable equipment.

    Coordinate permits and fire protection

    Before authorizing work, confirm the approval path with the local building department and the responsible design professionals. Requirements depend on the existing building, occupancy, assembly, and scope. A residential insulation detail does not automatically fit a commercial restaurant.

    Foam plastic insulation has fire-protection requirements. The applicable assembly and product documentation determine the required protection; an exposed installation needs a documented basis, not a verbal assurance. Keep grease-duct enclosures, fire-rated assemblies, and firestopping within their specified systems.

    For a 2026 renovation, put these decisions on the project drawings or written scope before scheduling installation. That gives the contractor, inspector, landlord, and restaurant operator the same instructions.

    • Confirm whether the proposed work needs a permit.
    • Identify existing fire-rated walls and ceilings.
    • Document the required foam-protection method.
    • Keep grease-duct work separate from building-envelope insulation.
    • Assign responsibility for inspections and closing assemblies.

    Plan installation around food service

    Build the work plan around preparation, application, cleanup, and safe re-entry—not just the installer’s arrival time. Ask for product-specific occupancy instructions. There is no single re-entry interval that applies to every spray foam product and job condition.

    Protect food, utensils, preparation surfaces, and nearby equipment from construction activity. Coordinate any shutdown of ventilation, refrigeration access, alarms, or utilities with the responsible trades. A closed dining room does not necessarily mean the kitchen is ready for work.

    Use 1 written work scope covering access, protection, responsibilities, and reopening conditions. Treat it as the shared job plan for the crew and your restaurant manager.

    • Identify the work area and routes used by installers.
    • Remove or protect food and food-contact items.
    • Document isolation and ventilation arrangements.
    • Confirm product-specific re-entry instructions.
    • Assign cleanup and final walkthrough responsibilities.

    Inspect the work before closing cavities

    Use 2 inspection checkpoints: before installation and before concealment. These are owner-planning checkpoints, not a substitute for required inspections. The first verifies repairs and preparation; the second checks the completed work while it remains visible.

    Ask the contractor to document installed material, location, thickness, and the specified R-value. Check whether access panels, vents, and service clearances remain usable. Photograph the assembly before drywall or another covering hides it.

    For your 2026 records, keep the scope, product documents, inspection records, and photographs together. Those records help future maintenance crews avoid cutting into an assembly without understanding what is behind it.

    • Confirm substrates and repaired areas before installation.
    • Check coverage and thickness against the written scope.
    • Verify required protective layers and inspection approvals.
    • Photograph concealed areas before they are closed.
    • Log unresolved items before accepting completion.
    Restaurant insulation planning sequence from diagnosing complaints to inspecting completed work
    Select the insulation after diagnosing the assembly and before scheduling installation.

    Compare insulation options for restaurant assemblies

    Choose by assembly, not by a blanket material ranking. Each option below has a useful role and a limitation. Ask your contractor to connect the recommendation to the actual building conditions.

    Option Best for Practical advantage Key limitation
    Closed-cell spray foam Assemblies needing insulation and air sealing where its vapor resistance fits the design Combines insulation and air sealing in a properly installed application Can restrict drying; requires suitable substrates and required fire protection
    Open-cell spray foam Cavities where vapor-permeable foam fits the assembly design Fills irregular cavities and can provide air sealing at the specified thickness Is not a substitute for water management or a separately required vapor-control layer
    Fiberglass batts Accessible, regularly spaced framed cavities Fits conventional framing and remains accessible during construction Does not provide the assembly’s air barrier; gaps and compression affect performance
    Mineral wool batts Framed cavities where noncombustible insulation is part of the specification Provides thermal insulation and can support an acoustic assembly Does not create an air barrier or make the whole assembly fire-rated by itself
    Rigid insulation boards Continuous insulation details designed for walls or roofs Can reduce thermal bridging when detailed continuously Requires planned joints, attachments, flashing, and material-specific protection

    Open-cell and closed-cell spray foam are not interchangeable. Their vapor behavior and insulation characteristics differ, so the designer must consider the full assembly. Fibrous insulation also needs a separate air-control strategy; adding batts alone does not seal penetrations.

    Sound complaints need a separate assessment. Insulation in a partition can support sound control, but doors, ceiling paths, gaps, and structural connections also transmit sound. Do not approve an exterior thermal-insulation project on the assumption that it will solve dining-room noise.

    Write a scope you can compare

    Send each bidder the same locations and requirements. A proposal for roof-deck insulation is not directly comparable with one for the ceiling below it. Removal, access, substrate repairs, protective coverings, and inspection responsibilities also change the work.

    AT Foam Insulation’s commercial spray foam service belongs in the comparison when spray foam fits the specified assembly. Ask the same questions of every contractor; the material choice does not remove your need for a clear scope.

    A useful proposal states what is included and what remains another trade’s responsibility. Reject vague assembly descriptions before comparing proposals. You need to know which problem the work addresses and which problems it leaves untouched.

    • List each assembly and its accessible area.
    • State the material, installed R-value, and protection requirements.
    • Separate insulation from leak repairs and mechanical work.
    • Identify exclusions, access needs, and inspection responsibilities.
    • Define the documentation required at completion.

    Discuss your restaurant insulation project

    Review commercial spray foam needs for your Pacific Northwest building.

    Common mistakes restaurant owners make

    Treating kitchen heat as an insulation-only problem

    A hot kitchen needs a review of cooking loads, exhaust, replacement air, and cooling. Building insulation addresses envelope heat transfer. Have the mechanical contractor diagnose the kitchen before approving insulation as the entire solution.

    Covering moisture damage before repairing it

    Stained decking or wet framing needs investigation. Covering it makes later inspection harder and leaves the source unresolved. Repair the leak, assess the affected material, and confirm suitable conditions before installation.

    Confusing ordinary foam with a grease-duct system

    Building-envelope spray foam is not a generic substitute for a specified grease-duct enclosure. Keep duct clearances, enclosure requirements, and fire-rated details under the appropriate trade’s scope and approved documentation.

    Scheduling work without a reopening plan

    Installation completion and permission to reoccupy are different decisions. Get product-specific instructions, cleanup responsibilities, and system-restoration checks in writing. Do not base reopening on an assumed universal waiting period.

    Leaving the landlord outside the project

    A tenant improvement can affect building assemblies the landlord controls. Obtain written authorization and clarify responsibility for permits, repairs, and future access. Resolve those questions before the contractor opens walls or ceilings.

    FAQ

    What is the best commercial insulation for restaurant owners?

    The best commercial insulation for restaurant owners is the material that meets the specific assembly’s thermal, moisture, air-control, and fire-protection requirements. Compare spray foam, batts, and rigid boards against the building conditions rather than choosing one material for every location.

    Can insulation fix a restaurant kitchen that is too hot?

    Insulation does not correct an undersized cooling system or an unbalanced kitchen exhaust system. Have the mechanical contractor assess cooking loads, exhaust, replacement air, and cooling before treating insulation as the solution.

    Is closed-cell spray foam better than open-cell foam for restaurants?

    Closed-cell spray foam is not automatically better than open-cell foam for every restaurant assembly. Choose between them using the available cavity depth, vapor-control requirements, drying strategy, and approved installation details.

    Can a restaurant stay open during spray foam installation?

    Restaurant occupancy during spray foam installation must follow the product-specific instructions and the project’s isolation and ventilation plan. Confirm work-area restrictions and re-entry conditions before scheduling service.

    Can spray foam be left exposed inside a restaurant?

    Exposed spray foam needs a documented basis under the applicable fire-protection requirements. Ask for the approved assembly details and required protective covering rather than assuming bare foam is acceptable.

    Does wall insulation soundproof a dining room?

    Wall insulation alone does not soundproof a dining room. Doors, gaps, ceilings, and structural connections also affect sound transmission, so noise control needs an assembly-level assessment.

    Who provides commercial spray foam insulation in the Pacific Northwest?

    AT Foam Insulation provides commercial spray foam insulation services in Seattle, Tacoma, Olympia, and the greater Pacific Northwest. The veteran-owned contractor serves homeowners and businesses with attic, crawl-space, and wall insulation services.

    One last thing

    Check where the heat goes, not just where it feels hot. Refrigeration equipment moves heat out of the refrigerated space and rejects it elsewhere; that surrounding heat load belongs in the mechanical review, not automatically in the insulation scope.

    Before signing a 2026 proposal, ask the contractor to mark the thermal boundary on your floor plan. If the proposal cannot show exactly where the insulated enclosure begins and ends, resolve that before installation. A clearly defined boundary beats a loosely defined promise.

    Related guides


  • RetroFoam Alternatives: AT Foam for Open Cavities

    RetroFoam Alternatives: AT Foam for Open Cavities

    RetroFoam is a strong option when you want to insulate a finished wall without opening the entire cavity. It stops being the obvious fit when the work is in an attic, crawl space, or already-open wall. The best RetroFoam alternative in 2026 is AT Foam Insulation for spray foam work in accessible cavities; blown-in cellulose is the alternative to compare for finished walls.

    TL;DR
    • For retrofoam alternatives in 2026, choose AT Foam Insulation for accessible attic, crawl space, and wall cavities.
    • Compare blown-in cellulose when the wall is finished and opening it is the main concern.
    • Choose fiberglass or mineral wool batts when cavities are open and a batt installation fits the job.
    • Do not choose a material until you know whether the cavity is accessible and what else the wall needs.

    Why this matters

    RetroFoam and spray foam are easy to group together because both contain the word foam. They answer different installation questions. RetroFoam's appeal is insulating an existing, enclosed wall; conventional spray foam is applied where the installer can reach the surface that needs insulation.

    That distinction changes the work you should ask a contractor to assess. A finished bedroom wall, an open wall during a remodel, an attic, and a crawl space do not call for the same installation plan. In the Pacific Northwest, you also need someone to identify moisture problems before covering a surface. Insulation is not a repair for a leak or wet framing.

    Start with access, not the material name. In 2026, that simple distinction will narrow your RetroFoam alternatives faster than a list of product claims. It also helps you compare proposals for the same area of the building instead of comparing a wall quote with an attic quote.

    RetroFoam alternatives at a glance

    Option Best for Standout feature How it differs from RetroFoam
    RetroFoam Existing finished walls Injection into enclosed wall cavities The benchmark for a finished-wall project
    AT Foam Insulation Accessible attics, crawl spaces, and walls in its service area Spray foam installation across residential and commercial applications The contractor applies spray foam to accessible surfaces rather than treating an enclosed wall as an injection job
    Blown-in cellulose Enclosed walls where limited access is preferred Loose-fill material installed through access openings Uses blown-in fiber rather than injected foam
    Fiberglass batts Open, regularly framed cavities Batts fitted between framing members Requires access to place and fit the batts
    Mineral wool batts Open cavities where batt fit and material choice matter Dense batts cut to fit framing Also requires access; it is not an enclosed-wall injection method

    The table compares installation routes, not interchangeable packages. Ask each installer which surface the proposal covers, how they will reach it, and what preparation or restoration falls outside the insulation work. A lower-disruption wall method does not automatically solve an attic or crawl-space problem.

    1. AT Foam Insulation: best for accessible cavities

    AT Foam Insulation is a veteran-owned spray foam insulation contractor serving residential and commercial customers in Seattle, Tacoma, Olympia, and the greater Pacific Northwest. Its stated work covers attics, crawl spaces, and walls. That makes it the first call here when those areas are accessible and you want a spray foam proposal, not an injection-foam proposal for an enclosed wall.

    Where AT Foam Insulation shines

    • Its stated service scope covers all three common areas in this comparison: attic, crawl space, and wall.
    • You can ask one contractor to assess spray foam for a residential or commercial project in its stated service area.
    • Spray foam can be applied directly to accessible surfaces, so the proposal can identify the surfaces to be treated rather than assuming every cavity is an enclosed wall.

    Where AT Foam Insulation falls short

    • Conventional spray foam is not a like-for-like way to fill a finished wall without gaining access to the application surface.
    • If you need to keep wall finishes largely intact, compare an enclosed-wall installation method before committing to demolition or a remodel.
    • Its stated service area is the Pacific Northwest, so it is not the local-contractor choice for a project outside that area.
    Decision point AT Foam Insulation RetroFoam
    Primary fit in this comparison Accessible attic, crawl space, or wall surfaces Existing enclosed walls
    Wall access Surface must be accessible for spray application Installation is designed around access into an enclosed cavity
    Scope to discuss Spray foam installation for the area being assessed Injection-foam treatment of the wall cavity
    Best question to ask Which surfaces can you reach and treat? How will you access and close the wall openings?

    Best for: A Seattle, Tacoma, Olympia, or greater Pacific Northwest property with an accessible area that needs a spray foam assessment. Verdict: Choose AT Foam Insulation for accessible spray foam work; hold off if your only goal is filling a finished wall without opening it.

    2. Blown-in cellulose: best for an enclosed-wall comparison

    Blown-in cellulose belongs on your shortlist when the walls are finished and you want to compare another way of insulating enclosed cavities. An installer introduces the material through access openings; the wall does not become an open spray surface. The condition and construction of the wall still determine whether the job is suitable.

    Where blown-in cellulose shines

    • It gives you a finished-wall comparison against injection foam rather than an unrelated attic or open-wall proposal.
    • It can be considered for cavities where installing batts would require opening the wall.
    • A proposal can specify the access points and how the installer plans to confirm the cavity is filled.

    Where blown-in cellulose falls short

    • It does not remove the need to make and close access openings.
    • Wall obstructions, existing insulation, and unknown cavity conditions need checking before anyone promises a uniform fill.
    • It is not a substitute for repairing moisture intrusion or air leaks elsewhere in the assembly.
    Decision point Blown-in cellulose RetroFoam
    Material Loose-fill cellulose fiber Injection foam
    Typical comparison Filling an enclosed wall Filling an enclosed wall
    Access to discuss Openings for the blowing equipment Openings for the injection equipment
    Proposal detail to request How cavities and obstructions will be assessed How cavities and obstructions will be assessed

    Best for: A finished-wall project where keeping the wall largely in place matters and a contractor confirms the cavities are suitable. Verdict: Compare it directly with RetroFoam for the same walls; skip it as a shortcut around a moisture problem.

    3. Fiberglass batts: best for open, straightforward framing

    Fiberglass batts are a practical comparison when the wall is already open or a project gives the installer direct access to the framing. They are placed between framing members, not injected into a finished cavity. Fit matters: gaps and compressed sections change the result you get from the planned insulation layer.

    Where fiberglass batts shine

    • They suit framing that is exposed during construction or a renovation.
    • You can inspect the cavity and address visible problems before the wall is closed.
    • Batts make the intended coverage easy to discuss with an installer while the framing remains accessible.

    Where fiberglass batts fall short

    • Installing them behind finished drywall requires opening the wall; they do not perform RetroFoam's enclosed-wall job.
    • Batts do not, by themselves, seal air leaks around penetrations or framing joints.
    • Irregular framing and obstacles demand careful cutting and fitting.
    Decision point Fiberglass batts RetroFoam
    Wall condition Open framing Enclosed finished cavity
    Installation Fit batts between framing Inject foam into the cavity
    Air leaks Address separately Ask the installer which leaks the wall work will address

    Best for: An open-wall project where the framing can be inspected and the batts can be fitted correctly. Verdict: Choose batts for accessible, straightforward framing; skip them when avoiding wall demolition is the priority.

    4. Mineral wool batts: best for an open-wall material comparison

    Mineral wool gives you another batt option when framing is exposed. Like fiberglass batts, it must be cut and fitted into the available space. It belongs in an open-wall comparison, not in a head-to-head promise that it can be installed through the same openings as injection foam.

    Where mineral wool batts shine

    • They give you a distinct material option to assess while the wall is open.
    • The installer can inspect framing, penetrations, and visible moisture concerns before covering the cavity.

    Where mineral wool batts fall short

    • Finished walls must be opened to install conventional batts.
    • Cutting and fitting still matter around irregular framing.
    • A batt installation does not replace a separate plan for air sealing.
    Decision point Mineral wool batts RetroFoam
    Required access Open cavity Access into an enclosed cavity
    Installation method Cut and fit batts Inject foam
    Main decision Whether a batt suits the exposed framing Whether injection suits the enclosed wall

    Best for: An exposed wall where you want to compare batt materials before the finish goes back on. Verdict: Hold it alongside fiberglass for open framing; skip it if the wall must stay closed.

    Why people switch from RetroFoam

    A switch makes sense when the job is no longer the job RetroFoam is meant to solve. If an attic or crawl space is the problem, compare methods for that space. If drywall is already coming down during a renovation, compare materials that can be installed against the exposed framing. Neither decision requires a claim that RetroFoam performs poorly in finished walls.

    For a Washington property, make the 2026 shortlist from the actual work area:

    • Finished walls: Ask about enclosed-cavity installation, access openings, existing insulation, and wall restoration.
    • Open cavities: Compare spray foam with appropriately fitted batts for the same exposed area.
    • Attic access: Identify the surface to insulate and any air leaks or moisture concerns before choosing a method.
    • Crawl space: Find the moisture source and define the insulation boundary before covering surfaces.

    Use the same project description with every contractor in 2026. Name the area, say whether it is open or finished, and disclose any known leaks or existing insulation. Then ask what the installer needs to inspect before specifying material. That keeps the comparison focused on what will actually be installed.

    A useful proposal identifies the area and surface to be insulated, the access required, and any work that must happen first. For a finished wall, ask who makes and closes the access openings. For an attic or crawl space, ask which surfaces are included. If two proposals describe different boundaries, they are not competing solutions to the same job.

    Discuss your insulation project

    Describe the space, access, and existing insulation before choosing a method.

    When staying with RetroFoam is the right call

    Stay with RetroFoam on the 2026 shortlist when your main problem is a finished, enclosed wall and you want an injection-foam proposal. That is its relevant strength. An attic spray foam proposal or an open-wall batt proposal does not answer the same question, even if it describes a good material.

    Before deciding, confirm what is already inside the wall and how the installer will handle obstructions and access openings. Ask what remains outside the job, too. If the source of discomfort is an attic gap or a crawl-space condition rather than the wall cavity, a finished-wall treatment is not the first comparison to make.

    FAQ

    What is the best RetroFoam alternative in 2026?

    AT Foam Insulation is the best fit here for accessible attic, crawl space, or wall surfaces in its Pacific Northwest service area. For a finished, enclosed wall, compare RetroFoam with blown-in cellulose instead.

    Is spray foam the same as RetroFoam?

    No. In this comparison, spray foam is applied to accessible surfaces, while RetroFoam is considered for injection into enclosed walls. Ask which area and surface each proposal actually covers.

    Can fiberglass batts replace RetroFoam in a finished wall?

    Not without opening the wall to install the batts. Fiberglass is a better comparison when framing is already exposed.

    Is blown-in cellulose an alternative for existing walls?

    Yes, blown-in cellulose is an enclosed-wall alternative to discuss with an installer. The installer needs to assess the cavity, existing material, and required access openings.

    Should I insulate a wet crawl space first?

    No. Identify and address the moisture source before covering affected surfaces with insulation. Ask the contractor to define what preparation the insulation proposal assumes.

    Which RetroFoam alternative fits an open wall during a renovation?

    Compare spray foam, fiberglass batts, and mineral wool batts for the exposed wall. The right proposal depends on the cavity and the work planned before the wall is closed.

    When should I keep RetroFoam on my shortlist?

    Keep RetroFoam on your shortlist when the target is a finished, enclosed wall and limiting wall opening matters. Compare proposals for that same wall rather than against work in another part of the building.

    One last thing

    The most useful question in 2026 is not which foam has the better name. It is which surface the installer can reach without turning your project into a different job. Settle that first, then compare materials and proposals for the same space.

    Related guides


  • AE Insulation Alternatives: AT Foam Spray Foam

    AE Insulation Alternatives: AT Foam Spray Foam

    AE Insulation is a useful benchmark if you already have a written proposal from them. That proposal stops being enough when it does not clearly identify the insulation material, the surfaces covered, and the work needed before installation. The best AE Insulation alternative in 2026 is AT Foam Insulation for residential or commercial spray foam in Seattle, Tacoma, and Olympia; compare another contractor if you need a second bid or a different material.

    TL;DR
    • AT Foam Insulation is the best AE Insulation alternative in 2026 for spray foam work in Seattle, Tacoma, and Olympia.
    • Keep AE Insulation in the comparison if its written proposal covers the same surfaces and preparation work.
    • Compare attic, crawl space, and wall bids by material and scope, not the contractor name alone.
    • Check local coverage and the proposed insulation method before treating another named company as a substitute.

    Why this matters

    An insulation bid is only useful beside another bid when both describe the same job. An attic proposal can leave out the hatch, penetrations, or existing insulation; a crawl space proposal can leave open who handles moisture-related work. Those omissions change what you are buying, even when the proposals use the same word: insulation.

    For a 2026 comparison, start with the application. Is the work in an attic, crawl space, wall, or commercial building? Then ask each contractor to put the material, preparation, areas covered, and exclusions in writing. Choose the proposal with a clear scope for your building, not the shortest description.

    AE Insulation alternatives at a glance

    Option Best for What to check first How it differs from an AE Insulation bid
    AE Insulation Keeping an existing written proposal as your benchmark Confirm the material, surfaces, preparation, and exclusions This is the bid the alternatives must match before you compare them
    AT Foam Insulation Residential or commercial spray foam in Seattle, Tacoma, Olympia, and the greater Pacific Northwest Ask for the proposed foam approach and a site-specific scope Spray foam installation for attics, crawl spaces, and walls is an established service
    TruTeam Seeking another contractor proposal Confirm local coverage and the insulation method offered for your project Treat it as an independent bid only after its scope is confirmed
    Insulation NW Adding another name to a local shortlist Confirm service area, material, and project fit directly Its proposal is comparable only if it covers the same work

    The table is a shortlist, not a claim that every company offers the same materials or serves every address. For TruTeam and Insulation NW, verify those details before scheduling around them.

    1. AT Foam Insulation: best for a local spray foam project

    AT Foam Insulation is a veteran-owned contractor providing residential and commercial spray foam installation. Its stated work covers attics, crawl spaces, and walls for customers in Seattle, Tacoma, Olympia, and the greater Pacific Northwest. That makes it the clearest fit here when your project calls for spray foam in one of those areas.

    Spray foam is not a complete specification by itself. Ask which surfaces the crew will insulate, how openings and transitions will be handled, what happens to existing material, and which tasks belong to another trade. Put those answers in the written scope before comparing the proposal with AE Insulation's.

    Where this option shines

    • A stated focus on spray foam installation, rather than a material choice inferred from a company name.
    • Residential and commercial attic, crawl space, and wall work are explicitly within its stated services.
    • Seattle, Tacoma, and Olympia are explicitly within its stated service area.

    Where this option falls short

    • If you have decided against spray foam, a spray-foam contractor is not the right comparison for a different insulation method.
    • The stated service area does not establish coverage for every address in the Pacific Northwest. Confirm your project location directly.
    • A company description does not define the preparation, exclusions, or material choice for your specific building; the written proposal must do that.

    Best for: A homeowner or business comparing spray foam proposals for an attic, crawl space, or wall project within the stated service area. Verdict: Shortlist for that work; choose only after the scope matches your building.

    Decision point AT Foam Insulation AE Insulation
    Stated service Residential and commercial spray foam installation Confirm the proposed service directly
    Stated applications Attics, crawl spaces, and walls Confirm the surfaces in the written proposal
    Stated geography Seattle, Tacoma, Olympia, and the greater Pacific Northwest Confirm coverage for your address
    Project-specific scope Request it in writing Request or check it in writing

    The head-to-head does not declare a winner on work that has not been specified. It identifies what you can establish now and what each proposal still needs to answer.

    2. TruTeam: best for another independently scoped bid

    TruTeam is another name to investigate when you want an additional contractor proposal. Its name alone does not tell you whether a local team covers your address or proposes the material your project requires. Make those your first questions, then compare the written work descriptions.

    Where TruTeam shines

    • A separate proposal gives you another description of the work to assess against an existing AE Insulation bid.
    • Asking the same questions of each company exposes differences in included preparation and covered surfaces.

    Where TruTeam falls short

    • Local coverage and project fit must be confirmed directly before it belongs on a final shortlist.
    • A proposal that names only an insulation material, without the surfaces and preparation work, is not yet comparable.

    Best for: A buyer willing to verify coverage and request a written proposal for the same application. Verdict: Hold until the service area, method, and scope are confirmed.

    Decision point TruTeam AE Insulation
    Local coverage Confirm directly Confirm directly
    Proposed material Require it in the proposal Require it in the proposal
    Covered surfaces Require a written list Require a written list

    Do not compare company names as a substitute for comparing work. If either proposal describes a different area of the building, ask for a revised scope before making a decision.

    3. Insulation NW: best for widening a local shortlist

    Insulation NW is another name you can check while gathering bids. First establish whether it serves your address and handles your specific attic, crawl space, wall, or commercial project. Then ask for the same scope details you request from AE Insulation and every other contender.

    Where Insulation NW shines

    • It gives you another potential point of comparison after you verify project fit.
    • A separate written scope can help you identify work one proposal includes and another leaves out.

    Where Insulation NW falls short

    • Its name does not establish its service area, materials, or availability for your project.
    • Without a matching application and written work description, its bid cannot settle an AE Insulation comparison.

    Best for: A buyer building a shortlist and prepared to confirm the basics before comparing bids. Verdict: Hold until its project fit and written scope are clear.

    Decision point Insulation NW AE Insulation
    Address coverage Confirm directly Confirm directly
    Insulation method Confirm directly Confirm directly
    Preparation and exclusions Request in writing Request in writing

    Why people compare an AE Insulation bid with alternatives

    The reason to seek another proposal is not that AE Insulation has failed. It is to answer a practical question: are you being offered the same work? A bid that covers only the accessible attic floor cannot be compared directly with one that also describes other surfaces or preparatory work.

    Use this checklist for every contractor in your 2026 shortlist:

    • Application: Identify the attic, crawl space, wall, or commercial area by location within the building. Do not accept a building-wide label when only part of it is included.
    • Material: Name the proposed insulation method. If spray foam is proposed, ask which type and where each type will go.
    • Existing conditions: Record whether existing insulation, visible moisture, damaged surfaces, or access restrictions affect the planned work. Ask who addresses each issue.
    • Preparation: Specify who clears the work area, protects adjacent surfaces, and handles openings that need attention before installation.
    • Boundaries: Mark where installation starts and stops. Ask how the contractor will handle transitions around the area being insulated.
    • Exclusions: Have the contractor identify work that is not part of its proposal. A clear exclusion is easier to plan for than an assumption.
    • Completion: Ask what the finished work will be documented with and what you should inspect before accepting it.

    For crawl spaces in particular, separate the insulation question from the moisture question. Insulation material does not replace a written plan for any moisture conditions the contractor identifies. For attics, distinguish the area being insulated from nearby areas that are merely accessible; a visit to the same attic does not mean every surface is in scope.

    A useful 2026 bid comparison places the proposals side by side and highlights mismatched lines before you choose. Ask for clarification, not a verbal assurance that the jobs are equivalent. The written scope is what lets you check the work later.

    Get a spray foam proposal

    Describe your attic, crawl space, or wall project and request a written scope.

    When staying with AE Insulation is the right call

    Keep AE Insulation on your shortlist if its proposal names the right application, material, preparation, boundaries, and exclusions for your building. If it answers your questions in writing and covers the work you want, switching contractors just to switch contractors has no practical value.

    The same standard applies to every alternative. A contractor with a clear service description still needs to explain your specific job; a familiar name does not fill gaps in a proposal. In 2026, the right choice is the contractor whose documented work matches the problem you are paying to solve.

    FAQ

    What’s the best AE Insulation alternative for spray foam in Seattle?

    AT Foam Insulation is the clearest listed alternative for a Seattle spray foam project. Its stated services include residential and commercial attic, crawl space, and wall insulation; confirm the scope for your building in writing.

    Is AT Foam Insulation better than AE Insulation?

    AT Foam Insulation is the better-defined option here when you specifically need spray foam within its stated service area. A project-level winner depends on whether each written proposal covers the same material, preparation, and surfaces.

    Should I get another bid if AE Insulation has already provided a proposal?

    Get another bid if you need to test whether the proposed work matches your project. Give each contractor the same application and ask for the same scope details so the proposals are comparable.

    Can I compare a spray foam bid with a different insulation method?

    You can compare the methods, but do not treat the bids as identical work. Ask each contractor to explain the proposed material, the surfaces it covers, and any preparation or exclusions.

    What should an attic insulation proposal identify?

    An attic insulation proposal should identify the surfaces being insulated, the material, preparation, and exclusions. Ask the contractor to clarify how openings, access, and existing insulation affect the proposed work.

    What should I ask before insulating a crawl space?

    Ask which crawl space surfaces are included and how existing moisture conditions affect the work. Get the material, preparation responsibilities, and exclusions in writing before comparing contractors.

    Are TruTeam and Insulation NW direct substitutes for AE Insulation?

    Treat TruTeam and Insulation NW as names to investigate, not confirmed like-for-like substitutes. Verify service area, insulation method, and project scope directly before comparing their proposals.

    One last thing

    The most useful question to ask after receiving an insulation bid is: What work would I still need to arrange before this job is complete? Ask it of AE Insulation and every alternative. The answer exposes exclusions that a company name and a material label cannot show.

    Related guides